How to Install a Subwoofer in a Car
When it comes to enhancing the audio experience in your car, installing a subwoofer is key. Subwoofers are specialized speakers designed to reproduce the lower frequency sounds in your music, the bass notes.
A well-installed subwoofer can make a significant difference by producing deep, robust, and resonant bass that makes every beat feel alive. Apart from delivering superior sound quality, subwoofers also improve the efficiency of your existing speakers by handling the low notes, which full-range speakers struggle to reproduce.
Subwoofers come in a myriad of sizes, shapes, and types, and it’s essential to understand which one suits your needs before you start the installation process. The most common type is a passive, component subwoofer. These lack a built-in power source and need an external amplifier to function. While these subs deliver high-quality sound, they are a bit more awkward to install.
Some subwoofers come with built-in power supplies, which simplifies the installation process but may limit customization. On the other hand, there are ready-made subwoofers and powered subwoofers (with built in amplifiers), which come pre-installed in an enclosure, ready to be integrated into your car’s audio system.
In this guide, we’ll delve into how to install each type of subwoofer into your car, providing a comprehensive guide that will help you enhance your car’s audio experience. So, whether you’re an audiophile eager to customize your car audio or a newb looking for more robust sound, this guide will navigate you through the process of installing a subwoofer in your car.
Preparation
Before diving into the actual process of installing a subwoofer in your car, it’s crucial to ensure you have all the necessary tools and understand the type of subwoofer you’re dealing with. Proper preparation will not only make the installation process smoother but also help prevent possible issues down the line.
Required Tools
Installing a subwoofer involves both mechanical and electrical tasks. As such, you’ll need a few basic tools to get started. These include:
- Screwdrivers: For mounting your subwoofer and enclosure.
- Wire cutters: Essential for preparing the wiring for connections.
- Electrical tape: To secure any exposed wiring.
- Drill (optional): Depending on your setup, you might need to drill holes to secure the subwoofer or run wiring.
Remember, it’s always better to gather all necessary tools before starting the installation process. It will save you time and help maintain the continuity of the work.
Subwoofer Type
Understanding the type of subwoofer you’re working with is vital as it dictates the installation process. Subwoofers come in three primary types:
- Passive Subwoofers: These subwoofers need to be hooked up to an external amplifier, and often require a quality enclosure to get optimal sound reproduction.
- Ready-Made Subwoofers: These subwoofers come pre-installed in an enclosure. The manufacturer has already matched the subwoofer to the enclosure, which simplifies the installation process.
- Powered Subwoofers: These subwoofers come with a built-in amplifier, eliminating the need to hook them up to an external one. These are the easiest subwoofers to install.
How to Install a Subwoofer in a Car
Now that we’ve covered the necessary preparations, let’s look at how to install a subwoofer in your car. We’ll start with component subwoofers, which are a popular choice due to their customizability and superior sound performance.
Passive Subwoofers
Passive subwoofers are unpowered, meaning they rely on an external amplifier for power. They don’t come pre-installed in an enclosure, so you’ll have to mount them in one yourself. This provides a significant amount of flexibility, as you can choose an enclosure that matches your car’s interior and your sound preferences. But it’s a bit more complex to install.
Mounting Passive Subwoofer to an Enclosure
Mounting your subwoofer to an enclosure is the first major step in the installation process. You’ll need to connect the leads of the subwoofer to the terminal cup on the enclosure, using the mounting screws to secure it.
This process is relatively straightforward and shouldn’t take more than a few minutes. However, ensure that the subwoofer is mounted firmly to prevent any vibrations or movement when the bass hits.
>> Get a Subwoofer Wiring Diagram to fit your set up <<
Wiring Options and Strategies
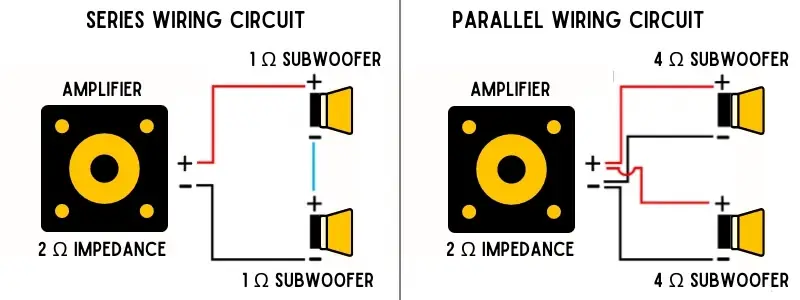
After mounting the subwoofer, you’ll need to connect it to the amplifier. The wiring options you choose can significantly influence the sound output of your subwoofer. You can wire the subwoofer in parallel for maximum output, or in series for a higher-impedance setup.
A parallel setup connects all positive ends together and all negative ends together, which increases power output but reduces impedance.
Conversely, a series setup involves connecting the negative end of one subwoofer to the positive end of the next, increasing impedance but reducing power output.
Running Wiring to the Amplifier
With your wiring strategy decided, you can now connect the subwoofer to the amplifier. Run the wires from the subwoofer’s terminal cup to the amplifier’s corresponding terminals. Be sure to hide the wires neatly to maintain the aesthetics of your car’s interior. Also, always double-check your connections to avoid any mistakes that could cause damage to your subwoofer or amplifier.
By following these steps, you can install a passive subwoofer in your car. It’s a straightforward process that requires minimal tools and can significantly enhance your car’s audio experience.
Next, we’ll explore how to install ready-made and powered subwoofers.
How to Install Ready-Made and Powered Subwoofers
The installation process we’ve covered so far was about passive subwoofers with the need of an external enclosure and amplifiers. Now, we’re going to expand our discussion to include ready-made and powered subwoofers, which come with their unique considerations and advantages.
Installing Ready-Made Subwoofers
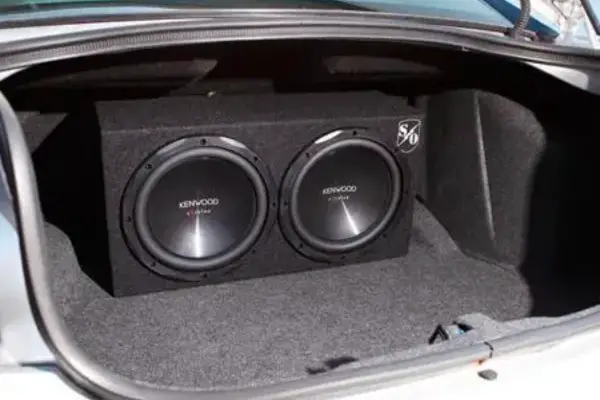
Ready-made subwoofers are an excellent choice for those looking for an easier installation. Since these subwoofers are pre-installed in an enclosure, you’ll primarily need to focus on securing the subwoofer in your car and connecting it to your audio system.
In sedans, non-amplified ready-made subwoofers usually fit in the trunk. When adequately powered, they can deliver strong bass that penetrates through the back seat.
To install, simply connect the speaker wires from the amplifier to the subwoofer and secure the enclosure with straps or brackets. If you need to drill holes for the brackets, be sure you’re not accidentally damaging vital car components.
Installing Powered Subwoofers
Powered subwoofers, also known as active subwoofers, come with a built-in amplifier. This makes the installation process a bit different from installing component or ready-made subwoofers.
With powered subwoofers, you won’t need to hook up speaker wires to an external amplifier, but you will need to install a patch cord or tap into your speaker leads for the input signal.
You’ll also need an amp wiring kit to connect the power, ground, and turn-on leads. This typically means running wires under your car seats. Regardless of the type of subwoofer you’re installing, always ensure it’s securely anchored.
By understanding the specifics of each type of subwoofer, you can select and install the one that best meets your needs, available space, and the rest of your system.
The next section will delve into the benefits and installation process of pre-fabricated sub enclosures.
Now Time for the Break-In Process
Once your subwoofer is installed and securely fastened, the next step is starting the break-in process. This phase is vital for ensuring your subwoofer operates as it should and achieves its maximum performance over its lifespan.
The break-in process, also known as ‘burn-in,’ is a necessary step to ensure your subwoofer performs at its best. After installation and wiring, play your subwoofer at a low volume for approximately 20 hours. This gentle introduction of power conditions the subwoofer and optimizes its performance.
Following the break-in period, you can then start to gradually increase the volume. This step will improve your subwoofer’s performance and lifespan by allowing the suspension to loosen up and perform more efficiently.
Remember, the key to a successful subwoofer installation lies not just in the installation itself but also in the care and maintenance of your equipment over time. By following these steps, you can enjoy powerful, high-quality bass in your car for years to come.
How to Install a Subwoofer in a Car
Installing a subwoofer in your car can seem like a complex task, but with the right guidance and tools, it’s an achievable project that can dramatically enhance your audio experience. Whether you opt for a passive sub, ready-made, or powered subwoofer, each type offers its unique advantages, and the choice ultimately depends on your needs and preferences.
Remember that the installation process doesn’t end when the subwoofer is securely placed and connected. Proper wiring is crucial for optimal performance, and a patient, methodical break-in period will ensure your subwoofer is conditioned for long-term use.
By following this guide, you’ll know exactly how to install a subwoofer in your car, bringing your audio system to the next level. Enjoy the deep, rich bass and the improved overall sound that a subwoofer can provide.

I am a passionate and skilled car audio enthusiast with 15 years of experience in the industry. My journey started when I replaced my first set of factory car speakers, sparking a deep love for high-quality sound. Since then, I have worked as a representative for renowned brands like Kenwood and Alpine.
With a background in both retail and distribution, I have developed a comprehensive understanding of the car audio market. Currently a certified (MECP) installer in the Mobile Electronics industry, my expertise lies in delivering top-notch audio installations. My knowledge, coupled with my genuine passion, makes me the go-to professional for all car audio needs.