How to Wire a Subwoofer
Wanting to know how to wire a subwoofer? While there’s a vast array of possible configurations that are largely dependent on your specific system setup, this article is a step by step guide.
Before we dive in, should you need a Subwoofer Wiring Diagram catered to any configuration, feel free to follow the provided link. However, we encourage you to stick around here to gain a robust understanding of the wiring process.
We’ll venture into a multitude of topics, from grasping the diverse types of subwoofers, pinpointing essential tools and materials, to acquiring in-depth knowledge on wiring both passive and active subwoofers.
Beyond the basics of wiring a subwoofer, we’ll delve into the complex subtleties of series and parallel wiring. We aim to help you comprehend how these wiring types impact your setup.
We’ll also offer some troubleshooting tips just in case you’ve wired your sub and it’s not working. So, without further ado, let’s dive right in…
Understanding Basic Concepts
Before we dive into the process of wiring a subwoofer, it’s essential to familiarize yourself with some basic sound system terminologies. Here are a few key terms:
- Amplifier: A device that takes a low-voltage signal and boosts it to a level that can drive speakers.
- Passive Subwoofer: A type of subwoofer that requires an external amplifier to power it.
- Active Subwoofer (or Powered Subwoofer): A type of subwoofer that has a built-in amplifier.
- Crossover: A device that directs sound frequencies to the appropriate speakers. For example, it sends high frequencies to small speakers and low frequencies to a subwoofer.
- RCA cables: A type of electrical connector commonly used to carry audio and video signals.
- Speaker Wires: Wires used to make the electrical connection between speakers and amplifiers.
- Impedance: A measure of electrical resistance in speakers and amplifiers. It’s measured in ohms (Ω).
Understanding these terms will make understanding how to wire a subwoofer easier and ensure you can set up your sound system to best suit your listening needs.
Types of Subwoofers
Subwoofers come in two main types: passive and active (powered) subwoofers. Each type has its advantages and disadvantages and suits different audio setups.
Passive Subwoofers
Passive subwoofers are units that don’t have a built-in amplifier. They’re powered by an external amplifier or a receiver.
This type of subwoofer is versatile and can be a good choice if you already have an amplifier or if you want to customize your sound system. But, they require careful matching with an amplifier to ensure the impedance and power levels are compatible.
Active Subwoofers
Active, or powered, subwoofers have a built-in amplifier. This means they only need a power source and an audio input to work.
The advantage of active subwoofers is that they are often easier to set up and use because you don’t have to worry about matching them with an amplifier. However, they’re typically less customizable and may require more power outlets.
Choosing between a passive and an active subwoofer depends on your specific needs and preferences. In general, if you want simplicity and ease of use, a powered subwoofer is a good choice. If you want more flexibility and control over your sound system, or if you already have an amplifier, a passive subwoofer could be a better fit.
Required Tools and Materials
Before you begin the process of wiring a subwoofer, you’ll need some essential tools and materials. These include:
- Subwoofer: Whether you choose a passive or active subwoofer will depend on your specific audio setup needs.
- Amplifier: Required for a passive subwoofer setup. Ensure the power and impedance match that of the subwoofer.
- Speaker Wires: For connecting the subwoofer to the amplifier in a passive setup.
- RCA Cables: Used to connect the subwoofer to the audio source. They are needed for both active and passive setups.
- Wire Cutters/Strippers: These will be used to cut and strip the insulation off the speaker wires.
- Screwdrivers: To secure the connections in some subwoofers or amplifiers.
How to Wire a Passive Subwoofer
Wiring a passive subwoofer involves connecting it to an external amplifier and then to your audio source. Here are the steps:
A. Connecting the Subwoofer to an Amplifier:
- Make sure all devices are turned off and unplugged from any power source to avoid electrical shock.
- Strip the ends of your speaker wire, revealing the bare wire underneath.
- Connect one end of the speaker wire to the subwoofer output terminals on the amplifier. Ensure you match the polarity to the corresponding terminal.
- Connect the other end of the speaker wire to the input terminals on the subwoofer, again matching the polarity. (check here for series/parallel wiring)
B. Connecting the Amplifier to the Audio Source:
- Connect the RCA cables to the audio output on your audio source, such as a stereo receiver. If your audio source has a dedicated subwoofer output (often labeled ‘SUB OUT’), use that.
- Connect the other end of the RCA cables to the audio input on the amplifier.
After connecting everything, check the connections carefully before turning the devices on. Also, remember to set the crossover on your amplifier to direct the low frequencies to the subwoofer. You are now ready to test and enjoy your new sound system.
How to Wire an Active Subwoofer
Active subwoofers, also known as powered subwoofers, come with a built-in amplifier. This means you only need to connect them to a power source and an audio source. Below are the steps on how to wire an active subwoofer:
A. Connecting the Subwoofer to a Power Source:
- Ensure the subwoofer is turned off.
- Plug the subwoofer’s power cord into a suitable power outlet.
B. Connecting the Subwoofer to the Audio Source:
- Connect one end of the RCA cables to the audio output on your audio source (TV, stereo receiver, etc.). If the audio source has a dedicated subwoofer output, it’s usually the best connection to use.
- Connect the other end of the RCA cables to the audio input on the subwoofer, usually marked as ‘INPUT’ or ‘LFE IN‘.
After making all the connections, carefully check them before turning on the devices. Most active subwoofers have their own volume and crossover controls, so you can fine-tune the bass output to your liking. Now, your active subwoofer should be ready to deliver that deep, powerful bass that enhances your audio experience.
Common Troubleshooting Tips
Even with careful setup and wiring, you may encounter some issues with your subwoofer. Here are some common troubleshooting tips to help you solve these potential problems:
A. No Sound from the Subwoofer:
- Check all connections: Make sure all wires and cables are properly connected, the polarity is correct (+ to +, – to -), and all plugs are fully inserted.
- Verify the power: Check if the subwoofer and other devices are powered on and functioning.
- Check the volume settings: Ensure the volume on your audio source, amplifier (if using a passive subwoofer), and the subwoofer itself are not set to zero.
- Test the audio source: Try using a different audio source to see if the problem lies with the original audio device.
B. Subwoofer Produces Distorted Sound:
- Check the volume levels: If the volume is too high on the amplifier or subwoofer, it can cause distortion. Try lowering the volume. Remember, if your subwoofer is new, it will need a break-in process.
- Inspect the wires: Damaged or low-quality cables can cause sound distortion. Inspect your cables for any visible damage and consider replacing them if needed.
- Check the crossover settings: Incorrect settings can result in the subwoofer attempting to play frequencies it’s not designed for, causing distortion. Make sure the crossover is set correctly.
C. Humming Noise from the Subwoofer:
- Check for ground loops: This is a common cause of a humming noise. If your subwoofer and other audio devices are plugged into different outlets, it may create a ground loop. Try plugging all devices into the same power strip.
- Check the cables: Faulty or poorly shielded cables can pick up interference, causing a humming noise. Try using different cables to see if the problem persists.
These tips should solve most common issues. If problems persist after trying these solutions, it may be best to consult a professional or contact the manufacturer’s customer service.
Series and Parallel Wiring and Its Effect on Impedance
When wiring subwoofers, you have two primary configuration options: series and parallel wiring. These configurations have a significant effect on the total impedance load seen by your amplifier, and they impact your sound system’s overall performance.
If your subwoofer and amplifier aren’t matching impedance, you can wire them in either series or parallel to change the impedance of your subwoofer set up to match that of your amplifier. Allow me to explain…
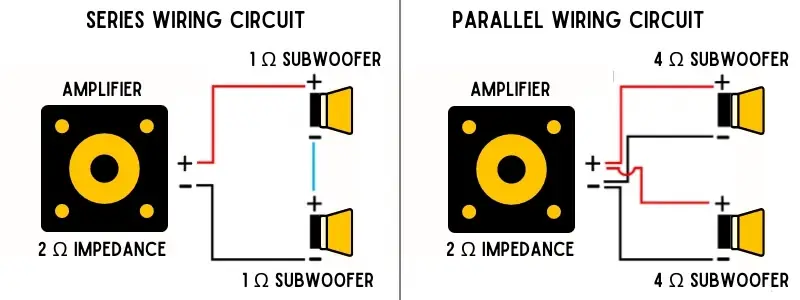
A. Series Wiring:
In a series wiring configuration, the subwoofers are wired one after the other in a single circuit. The amplifier’s positive terminal connects to the positive terminal of the first subwoofer.
The negative terminal of the first subwoofer then connects to the positive terminal of the second subwoofer, and so on. The last subwoofer in the series connects back to the negative terminal of the amplifier.
The total impedance (Zt) in a series circuit is the sum of the individual subwoofer impedances (Z):
Zt = Z1 + Z2 + Z3 + …
For example, if you have two 4-ohm subwoofers wired in series, the total impedance load on the amplifier would be 8 ohms (4 ohms + 4 ohms).
Series wiring increases the total impedance load, making it a good option if your amplifier cannot handle a lower impedance.
B. Parallel Wiring:
In a parallel wiring configuration, all positive terminals of the subwoofers are connected together to the amplifier’s positive terminal, and similarly, all negative terminals are connected to the amplifier’s negative terminal.
The total impedance in a parallel circuit is a bit more complicated to calculate. If all subwoofers have the same impedance, the total impedance (Zt) can be found by dividing the impedance of one subwoofer (Z) by the total number of subwoofers (n):
Zt = Z/n
For example, if you have two 4-ohm subwoofers wired in parallel, the total impedance load on the amplifier would be 2 ohms (4 ohms / 2).
Parallel wiring decreases the total impedance load, which allows your amplifier to output more power. However, not all amplifiers can handle low impedance, so be sure to check your amplifier’s specifications before choosing this wiring method.
Remember, incorrectly matching the impedance can lead to poor performance and can potentially damage your amplifier or subwoofers. Always ensure that the total impedance matches your amplifier’s specifications.
For full configuration of different subwoofer set ups, take a look at these Subwoofer Wiring Diagrams…
How to Wire a Subwoofer
Wiring a subwoofer may initially seem like a daunting task, especially for those new to the world of audio systems. However, with a solid understanding of the concepts, the right tools, and a bit of patience, you’ll find that it’s a process you can successfully complete on your own.
Remember, the key to a successful setup is ensuring that all components, including the subwoofer, amplifier, and audio source, are compatible in terms of their power and impedance specifications.
When done correctly, wiring your subwoofer will drastically enhance your audio listening experience, providing you with the rich, deep bass that truly brings your favorite music, movies, or games to life.

I am a passionate and skilled car audio enthusiast with 15 years of experience in the industry. My journey started when I replaced my first set of factory car speakers, sparking a deep love for high-quality sound. Since then, I have worked as a representative for renowned brands like Kenwood and Alpine.
With a background in both retail and distribution, I have developed a comprehensive understanding of the car audio market. Currently a certified (MECP) installer in the Mobile Electronics industry, my expertise lies in delivering top-notch audio installations. My knowledge, coupled with my genuine passion, makes me the go-to professional for all car audio needs.