How To Wire a Car Stereo Without a Harness
How to wire a car stereo without a harness is a more common question than one might think. Not everyone is lucky enough to get a straight in-and-out replacement, and there isn’t a global car stereo wiring color code.
Today’s aftermarket head units come with a wiring harness, and most factory set ups have one too, and this allows us to basically plug our new head unit into the factory set up and play.
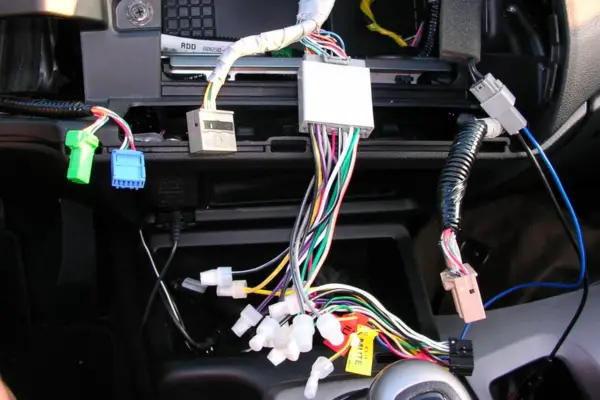
But what happens if you go to install your new aftermarket stereo and there’s no wiring harness, but instead bare wires?
It certainly looks daunting and it makes life difficult, but a bit of know-how and you’ll be able to wire a car stereo without a harness.
The first thing you should do is look for your car manual. If you can’t find it, go online and search your car’s make and model and look for a simple factory car stereo wiring diagram. This will tell you what all the different colors are for.
If you can’t find anything, you can test the factory car stereo wiring yourself and match them with the corresponding wires on your new radio harness.
For a step-by-step guide on how to wire a car stereo without a harness, read on…
Tools Needed for The Job
You can only do the job with the right tools at hand, so make sure you have the following:
- Test Light or Multimeter
- Handheld Crimpers
- Crimp Caps
- Tesa Tape
- Zip Ties
- 9V Battery
- Alligator Clips
- Screw Driver
- Car Stereo Removal Keys
How To Wire a Car Stereo Without a Harness
A radio wiring harness makes life much easier, but of course, you’re reading this so you probably don’t have one and you want to know how to wire a car stereo without a harness.
As we don’t have a factory wiring harness, we need to determine which wire on the factory set up is for which, because these color wires aren’t always the same as those on aftermarket car radios.
Once you determine the matching wires, you’re going to crimp each wire of the factory wiring together with the corresponding wires on your new radio wiring harness.
Make sure you crimp one wire at a time, or you could end up doing some damage if you touch the constant wire and the other wires at the same time.
Step 1 – Prepare The Wires and Get a Solid Grounding
Make sure the car is switched off to start with. If you haven’t removed your factory car radio, you need to do this. Each one is different but you may need a screwdriver and some removal keys.
Then the first thing to do is make sure you strip about half an inch off the end of each wire in the factory wiring to prepare to match up and crimp with the aftermarket harness wires – these should be ready to just pull off.
Once you’ve prepared the wires, it’s a good idea to start with the power wires, which will be the red, yellow, blue, orange, and your black grounding wire. Most car audio manufacturers use the same colors, but not all and especially factory set ups, so it’s a good idea to double check everything with your test light.
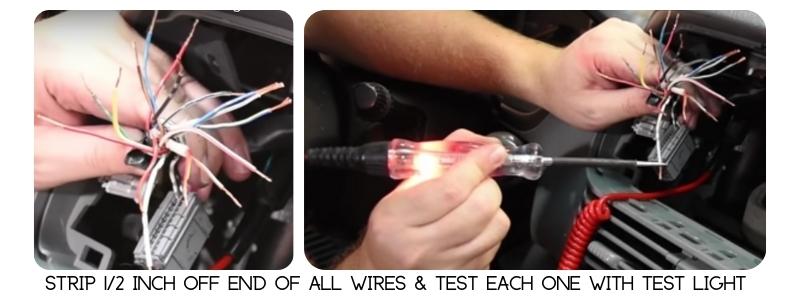
With the extended spring cord on the test light, connect the alligator clip to some bare metal so you get a grounding for your test light. This can be any bare metal, and you’ll find some behind the head unit mounting hole.
Step 2 – Determine and Crimp Corresponding Factory and Aftermarket Power Wires
Now, with your car key switched off, you want to determine which of the factory wires are a match for your constant 12V (yellow) wire on the aftermarket harness.
Remember to keep the grounding via the extended spring cord, and now with the test light end, touch each wire as a test to make sure the test light doesn’t brighten up with any wire, apart from the constant.
The constant is the wire that goes to your battery and draws a constant power even when the ignition is off. This should be the only one that lights up as you have no power on.
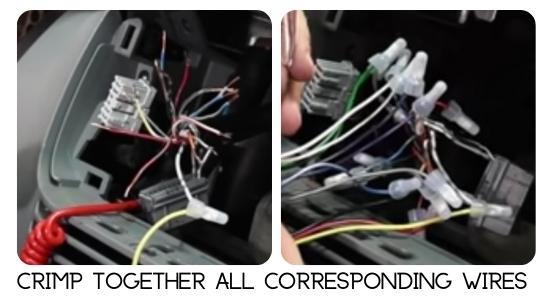
When you find it, twist it together with the yellow wire in your aftermarket radio wiring harness, and then crimp them together with a good crimp cap.
This is the basic outline for how to wire a car stereo without a harness, with all other corresponding wires, but allow me to explain in greater detail as there’s a slight differentiation with each set of wires.
It’s a good idea to wrap some tesa tape around each wiring pair as you go on. This ensures you get a neat job, and will make it easier to put back when you’ve finished.
Congratulations, you’ve got your constant connection. Now it’s time to match the Accessory wires, which should be the red wire in your aftermarket stereo wiring harness.
Now you want to switch your car electrics on without actually turning the ignition on, so just turn the key so you have the car electrics on.
Now do the same thing as you did with the constant wire, with the test light, test the wires until you find one that lights up.
When you find it, it’s a good idea to test it by switching the key back off, to make sure the test light goes off. If it goes off when you switch the key off, you have found the Ignition/Accessory wire.
Now twist the factory Accessory wire together with the red wire in your aftermarket radio wiring harness. And with your crimpers, crimp them together with a good solid crimp cap, just as you did with the constant wire.
Your other power wires will include the remote turn on (blue), illumination (orange), and you may have other wires such as a power antenna, and a steering wheel control.
Using the same method above, for example for your illumination wire, you should switch your headlights on and look for a wire that lights up. You want to match all your power wires up with the corresponding wire in your new stereo wiring harness, twist the bare wires together and cap them together with a crimp cap.
If you have some spare unused power wires in your factory or aftermarket wiring options and you can’t match them, you must cap them off so they’re not bare wires that can interfere with other wires.
Step 3 – Determine and Crimp Both Grounding Wires
Once all your power wires are crimped, it’s time to find your ground wire. On your new radio wiring harness, this will be the black wire, and to find the ground wire for the factory wiring, you have to do something a little different.
With the ground wire, you want to temporarily stick it in the constant power on the aftermarket radio wiring harness like in the image above, making sure it’s in tight enough not to slip out.
With the spring cord end of the test light, you should grip it onto the opposite end the ground wire that you just put into the back of the constant wire harness grip.
Now touch the test light on some bare metal to test that it lights up. If it lights up when you touch some bare metal, you have a ground connection and you’ve done it correctly.
Now you want to do that with your wires as you look for the ground wire. Once you find a wire that lights up, you have found the ground wire in your factory wiring. None of the other wires should light up as they’re not ground wires.
Now take the black ground wire that you just temporarily jammed in the back of your constant connection and twist it together with grounding before crimping them together.
Step 4 – Determine and Crimp Corresponding Speaker Wires
Speaker wires in factory wiring systems can be all colors. So, if you can’t find your original manual, you can google the make, model and the year of your car to determine which color wires are which.
If you can’t find the car stereo wiring diagram either in the manual or online, you can test them, but it’s a bit more awkward than testing the power wires.
To test your speaker wires, you’ll need a 9V battery, and some alligator clips to hook them from the battery to your factory speaker wires.
To start, you should have one alligator clip from the positive on your 9V battery to the positive speaker wire you’re testing. And have the other clip just on the 9V battery negative terminal for now, but don’t let it touch the negative speaker wire until you’re ready to test it.
You should remove the speaker grilles so you can see the speaker cone in all your car speakers. Then watch for which speaker pops up and listen for a little popping sound when you touch the negative alligator clip to your negative speaker wire.
The speaker that pops as you touch it, is the wire that you should twist them together and crimp them just as you did with the power wires.
For example, let’s say the first speaker wire you tested was the front left, you should twist and crimp the white (+) wire in your aftermarket radio harness to the positive wire you have just tested. Also, The white and black (-) front left speaker wire should be twisted and crimped to the negative wire that you’ve just tested also.
Now you want to do the same with the other speakers. So, if you have a 4-speaker set up the remaining colors will be grey and grey/black – front right; green and green/black – left rear; purple and purple black – right rear.
It’s important to ensure you connect the correct wires to each corresponding wire, positive and negative, too. If you get this wrong, you will still likely get sound from your speakers, but it won’t sound how it’s supposed to.
Step 5 – Time to Test Your Car Stereo Wiring Skills
So, now you should have crimped all corresponding wires together and you should be ready to test your car stereo wiring prowess. Remember, if you have any spare and unused wires, make sure you cap it off so it can’t interfere with any wires.
When you’ve finished everything, and you have put some tesa tape around each wire pairing, it’s a good idea to wrap some zip ties around all the wires, to keep it all together.
Now that it’s all wired up test your new car stereo and make sure everything sounds right. If it’s not working optimally, you should check your speaker wires as you’ve likely got them mixed up.
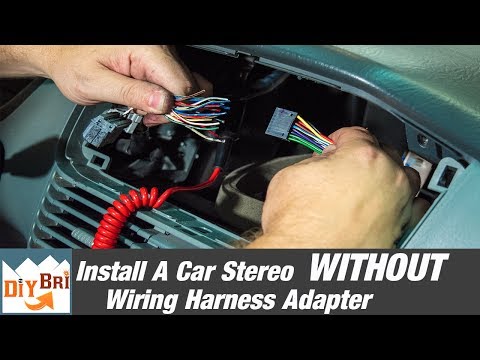
A Good Video Explaining How to Wire a Car Stereo with no Harness
How To Wire a Car Stereo Without a Harness – Simple Car Stereo Wiring Diagram
Now you know how to wire a car stereo without a harness, here’s a simple car stereo wiring diagram and explanation of each color.
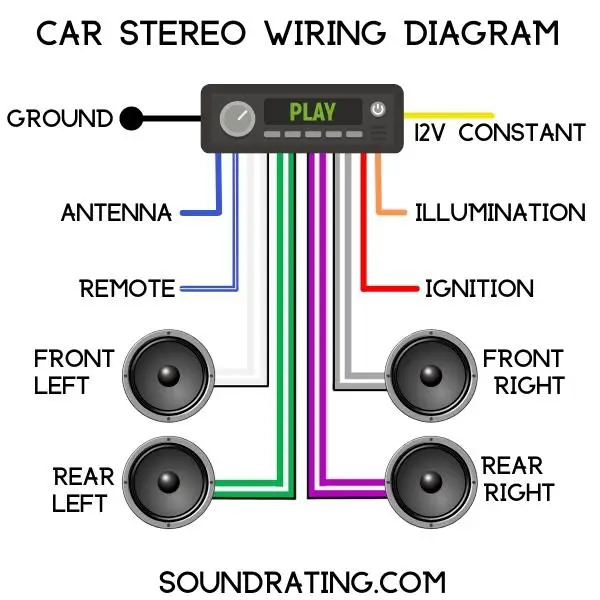
Each Color Wire Explained
Black – a negative ground wire for your vehicle. Sometimes factory systems don’t have a ground wire, and if this is the case with your car, you’ll have to ground the black wire on the aftermarket car stereo wiring harness.
Yellow – a wire that draws a constant 12 volt power, that things such as your clock depend on.
Red – a power wire that is used as a switched power source. This is usually called the Ignition or Accessory wire, and it receives power only when the key is turned to the accessory position. Not when the ignition is on.
Blue – the antenna wire that’s used to power an amplified or powered antenna, and is necessary to receive a good FM/AM signal on your car radio.
Blue/White – This is usually called the Remote Turn On wire and its needed to automatically turn your aftermarket amplifier on and off as you turn the car electrics on and off.
Orange – This is the illumination wire and is used to dim and brighten the car stereo display as you switch on and off your headlights.
White and White/Black – Front left speaker (+) and (-).
Grey and Grey/Black – Front right speaker (+) and (-).
Green and Green/Black – Rear right speaker (+) and (-).
Purple and Purple/Black – Rear left speaker (+) and (-).
How To Wire a Car Stereo Without a Harness
So, there you have it: how to wire a car stereo without a harness isn’t as straightforward as some installation jobs, but with a bit of patience, and knowledge, anyone can do it.
Sure enough, not having a factory car stereo wiring manual makes life difficult, but testing the speaker wires isn’t as awkward as it sounds. You just have to know where the speaker pop is coming from and make sure you don’t mix any wires up.
The same can be said for the power wires, too, but these are easier to determine which is which. But all in all, wiring a car stereo without a harness is a job anyone can do as long as you have the right tools beforehand and some patience.

I am a passionate and skilled car audio enthusiast with 15 years of experience in the industry. My journey started when I replaced my first set of factory car speakers, sparking a deep love for high-quality sound. Since then, I have worked as a representative for renowned brands like Kenwood and Alpine.
With a background in both retail and distribution, I have developed a comprehensive understanding of the car audio market. Currently a certified (MECP) installer in the Mobile Electronics industry, my expertise lies in delivering top-notch audio installations. My knowledge, coupled with my genuine passion, makes me the go-to professional for all car audio needs.