
How To Install An Amp In Your Car
How to install an amp in your car is that age old worry that drives many newbs to pay for their new piece of car audio equipment to be professionally installed.
An amplifier enhances your car soundscape, and if you add some good quality set of car speakers and a subwoofer or two, the difference will be absolutely something else.
However, even if you only upgrade your amplifier and keep the rest of your factory the set up, there will be a big difference, so getting a good quality car amplifier is really a no brainer.
But there’s getting an amp, and installing one. Many people new to the space don’t know how to do it, but a little bit of preparation, research and patience and anybody can.
Installing an amp in your car isn’t as difficult as it might seem, as long as you have the right parts and tools to carry the job out.
Of course, you could get it professionally installed, but the whole process should take about 3-4 hours, as long as you have everything in place beforehand.
So, if you pay someone to install your amp, 3-4 hours work will cost you a fair bit of money and could have been better spent getting an even better piece of equipment.
Fear not, if you want to know how to install an amp, read through and follow this step-by-step guide methodically, and you will do it, as well as the professionals, too.
Choosing The Right Amp For Your Car
Before anything you have to choose the right amp for your car, and of course they come in many sizes, channels, and costs. The most common amplifiers are mono subwoofer amps, 2-channel and 4-channel amps. However, 5-channel amps are becoming more popular as people see the benefits of running an entire car stereo system from one amplifier.
The amount of space you have will play into the size amplifier you buy, and most people install their amplifiers in the trunk of the car.
But it all depends on the type of vehicle you have. If the trunk isn’t available, installing the amp under your car seat is probably your next best option.
Another thing you haver to consider is the heat the amp will generate. Amplifiers can get hot, so always keep in mind airflow when looking for a good place to install your amp.
Wherever you choose to install it, make sure it’s on a flat and sturdy grounding and it has enough room for air to circulate.
If you have a subwoofer box in your trunk, mounting your amplifier on the other side of the enclosure is a common option, but again, always make sure there’s always optimum airflow wherever you install it.
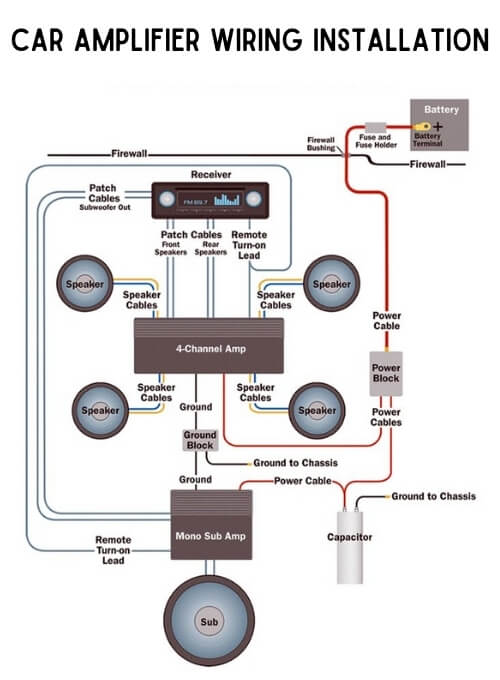
Another thing to consider is how you’re going to route the wiring from the amplifier to the head unit and to the battery. Always keep in mind the position of your battery and try to make the most direct path to it with the main power wire.
The best way to do it is to run the wiring under the floor trimmings that run along the bottom door sills, always following pre-existing wiring looms where possible.
The main power wire to the battery will probably have to pass through the firewall, and whenever possible use existing holes, following an existing wiring loom. If you can’t use existing holes, you’ll have to drill a new hole through the firewall.
Your RCA cables carry the input signal from the car stereo into the amplifier, and it’s best to route them on the opposite side of your car of your power wires. This will ensure they don’t interfere with each other.
So, if you have your amp and you’re going to DIY install it yourself, read on…
How To Install A Car Amplifier
What You’ll Need
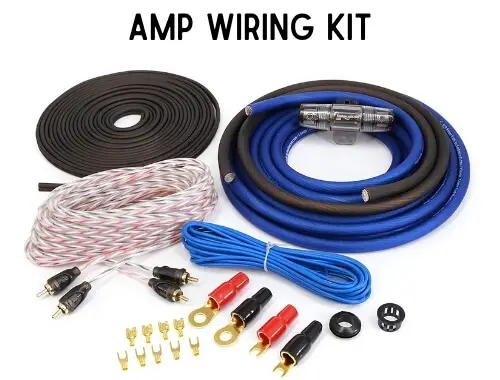
Most amplifiers come with their own amp wiring kit, but for those that don’t have one you’ll need the following:
- Main power wire (use the size amp manufacturer recommends)
- Inline fuse (use the size amp manufacturer recommends)
- Ground wire
- RCA cables
- Speaker wires
- Remote turn-on wire
- Connector plugs to suit head unit, amps and speakers
- Rubber grommets
- Rust sealant
- Drill, drill bits and tools
All of the above is basically an amp wiring kit, and a few extras. Make sure the wire you have is of good quality and that you have more than enough wire to reach the location of your amp. If your kit isn’t of good quality, I recommend this amp wiring kit.
Once you’re confident you have it all, you’re ready to go ahead with the installation.
Installing Your Amp Into Your Car
- First disconnect the negative battery terminal before starting anything.
- Then look to see if there are any factory holes in your car that you can use to run your wires through the firewall. If you don’t have any, you’ll have to drill some.
- Before you start drilling, make sure you know exactly what’s behind each place you’re going to drill, to make sure you avoid damaging anything.
- Also, when drilling, it’s a good idea to start with drilling a small pilot hole before drilling the right size. This will help guide you in and help you avoid any bigger mistakes.
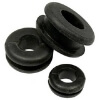 When you drill the hole, make sure you make it big enough to fit the wire and rubber grommet (in the picture). These will protect the wires from any chaffing they’d get if you just run them through frilled holes, and they’ll also improve friction and help seal the wires passing through it.
- Be aware that larger gauge wire such as 1/0 will require a specialized grommet and a much larger hole, so make sure you know exactly the size to get for the wire you’re using.
- Once you’ve drilled the hole, paint the bare metal around the hole to help protect it from rust and fit the grommet. I have to say here, don’t skip this point, because many people do, and rust is nightmare once it gets going.
- You can get the rust protection paint in either a can or a spray tin, but make sure you get a good quality brand. Use this on all parts of your car where bare metal might be exposed.
- Then put your car amplifier in place exactly where you intend to keep it and mark the mounting holes before drilling.
- Then move your amp while you drill the holes. Once done, you can fit your amp in place and secure it down using the mounting screws.
Wiring Your Amp Into Your Car
- Once your amp is installed securely, get your different wires from your car amp wiring kit and run the length from each input and output. Always leave yourself a bit extra, because it’s better to have loose cables than having them too tight.
- Once your wires are cut, you should cut all the insulation off the end of all wires, making sure you leave enough room to attach the connector plugs.
- Then run the power wire from the amplifier through the hole that you drilled in the firewall and to the battery. For those that don’t know, the firewall is the part that separates the engine compartment from the passenger compartment
- Install the inline fuse into the main power wire as close as possible to the battery terminal connection, because the wire between the fuse and the battery terminal will be unprotected. Also try to mount your fuse holder to something solid, so it’s not moving about.
- This is a critical step because it protects your car in the event of power wiring shorting out. It’s important not to insert the fuse until all other connections are made.
- The fuse size depends on the current going through the power wire. Take a look at your amplifier manual to find out the maximum current draw for your system. If it’s not there, look on the manufactures website and you’ll find it.
- Now, connect the negative terminal of your amplifier to the car’s chassis ground. Make sure the ground wire connection is to bare metal, and prepare the metal surface by sanding it and cleaning the area afterwards to make it a better ground connection.
- The negative power wire should be the same diameter as the positive power wire leading to the battery. Once it’s connected, paint it with your rust protection paint.
- Now run the RCA cables and remote turn-on lead from the back of your head unit to your amplifier’s mounting location.
- Remember, make sure to run your RCA cables on the opposite side of vehicle from the power wires, because it cause problems with performance if they’re too close together.
- When you’re ready, you can plug your RCA leads, speaker leads and remote turn-on lead from the amp into the back of the head unit.
- If your head unit doesn’t have a remote turn-on wire, you’ll have to wire the amp to a different connector in your fuse box. But it’s important to do this because if you don’t, your amp won’t switch off when your ignition is switched off.
- So, if your head unit doesn’t have a remote turn-on wire, you should wire the amp’s remote turn-on wire to the power wire of your head unit. Either that or run your amp’s remote turn-on wire to another power wire that runs from the accessories’ settings on your car’s ignition switch.
- Once this is done, you can then connect all your speaker and subwoofer wires from the amplifier to the corresponding speakers.

- If you need to run speaker wires through the interior of the vehicle, make sure to place them on the same side as the RCA cables, as again your power wires too close to connector wires could cause performance issues.
- Connect the speaker wires to your amplifier using ring terminals for connectors, and also connect the wires to your speakers using female spade terminals, as in both images respectively.
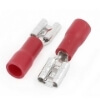
- Some people don’t bother with these types of connectors, but for a few dollars, they will give you a more secure connection, and both connectors will be a part of any good amp wiring kit.
- Most speakers have two different sized terminals. The biggest terminal is the positive and the smallest is the negative terminal.
- Once this is done, put the main power wire fuse in place, and if you’re sure all your connections are secure, you can reconnect the negative battery terminal.
- When done, it’s a good idea to check all your wiring to make sure it’s wired securely. If you’re confident it’s all done, you can then test your amp on the head unit, making sure you test each driver setting.
Congratulations, you’ve just installed your amp and are ready to power some proper volume on your next drive.
Installing An Amp In Your Car Isn’t As Daunting As It Seems
You’ve read this article, and now you know how to install an amp in your car. Many people are put off the idea because of the drilling and wiring, but it’s not as complicated as you think.
As long as you have all the right equipment, including a good amp wiring kit with good quality cables, and you follow each step, you can’t go wrong.
And if you install the amplifier yourself, it will save you a fair bit of money that can be spent on something better like putting it towards getting a good subwoofer for your car. Well, you’ve got a good quality amp, now you may as well upgrade the rest.
Related Reading
- What Is A Car Amp And What’s Its Use?
- How To Hook Up An Amplifier Without RCA Cables
- Big 3 Upgrade
- What’s The Best 4-Channel Amp?

I am a passionate and skilled car audio enthusiast with 15 years of experience in the industry. My journey started when I replaced my first set of factory car speakers, sparking a deep love for high-quality sound. Since then, I have worked as a representative for renowned brands like Kenwood and Alpine.
With a background in both retail and distribution, I have developed a comprehensive understanding of the car audio market. Currently a certified (MECP) installer in the Mobile Electronics industry, my expertise lies in delivering top-notch audio installations. My knowledge, coupled with my genuine passion, makes me the go-to professional for all car audio needs.