Big Three Upgrade – Improve Your Car Audio
When installing a car audio system of 1200 watts or more, you really should do a Big 3 Upgrade to improve your car’s electrical system before. This may seem daunting to some, but it’s so worth it.
Factory wiring is insufficient for running anything but basic audio systems. A Big 3 Upgrade means you’ll be installing larger diameter wires to the existing factory wire, usually 1/0 gauge wire.
This will improve the performance of your electrical system and increase its current handling capabilities. It will also ensure your car audio system gets the best current flow and least resistance, and ultimately allow you to install some more powerful audio components.
What Is The Big Three Upgrade?
The Big 3 upgrade is the process of upgrading your car’s stock wiring to provide the best flow possible for your new car audio system. Once done, you’ll be able to install the best car speakers, subwoofers, and a powerful car amp such as a 5-channel amplifier, which will allow you to run your entire car audio system, including 4 speakers and 2 subwoofers.
The wiring you upgrade when you do the job serves not only the car audio system but the electrical needs of the whole car. The thicker wiring will allow increased amperage flow, which will benefit your big wattage amplifier or sound system.
Instead, the big 3 helps to balance your electrical system and boost the flow of current. It does this by taking the strain off the factory wires and providing more amperage flow.
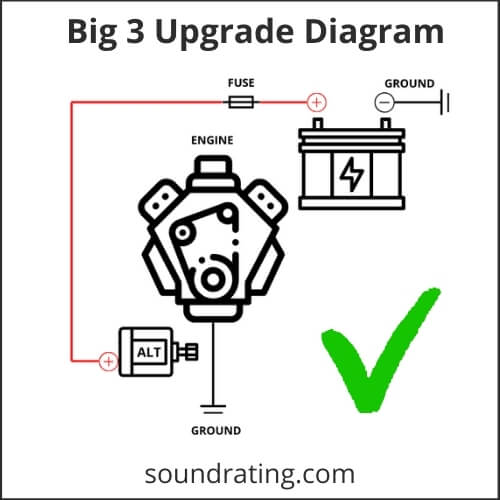
During the process there are three wires you’ll be upgrading.
These are the:
- Charging Wire, which runs from the positive side of the battery to the alternator.
- Battery Ground, which runs from the negative side of the battery to the chassis of the car.
- Engine Ground, which runs from the engine to the chassis of the car.
Why Do I Need The Big 3 Upgrade?
Undertaking the Big 3 Upgrade to your car will improve the electrical system and increase its current handling capabilities. This will give your car’s entire electrical equipment the current it needs to perform at its best.
Anyone who is considering upgrading their car stereo equipment, especially if you intend to run some powerful equipment, a Big 3 Upgrade should be the first upgrade done to your electrical system.
The wonderful thing about a big three upgrade is that it has no downsides. Even if your car’s stock wiring can accommodate your audio system, upgrading your wiring can:
- Better the performance of the whole electrical system
- Help the starter perform better when starting the car
Once done, you can upgrade your batteries, capacitors, or alternators if you need to. Meaning, it’s a win-win situation, whichever way you look at it.
How To Do The Big 3 Upgrade
You’ll need some tools for this job. To make it easy, you can get a complete Big 3 upgrade kit. If you get one of these make sure the kit you get is sufficient for your needs.
If you choose this route there’s still a bit of complexity involved in doing the job, and either way you’ll need some extra tools. Each engine bay is different, so the tools you use may differ, but you should definitely have the following at hand:
- Wrenches
- Sockets
- Ratchets
- Zip ties to tie down the wiring every couple of inches
- Hammer crimps or blowtorch with a solder
- Utility blade
- Wire cutters, big enough to cut the wire you are using
- Stainless steel bolts and nuts
Wire Size
The bigger the wire, the better. 1/0 AWG ground and power wiring is a popular choice because you won’t need to upgrade your wiring after this. But, any wire bigger than the factory wiring will help improve current flow.
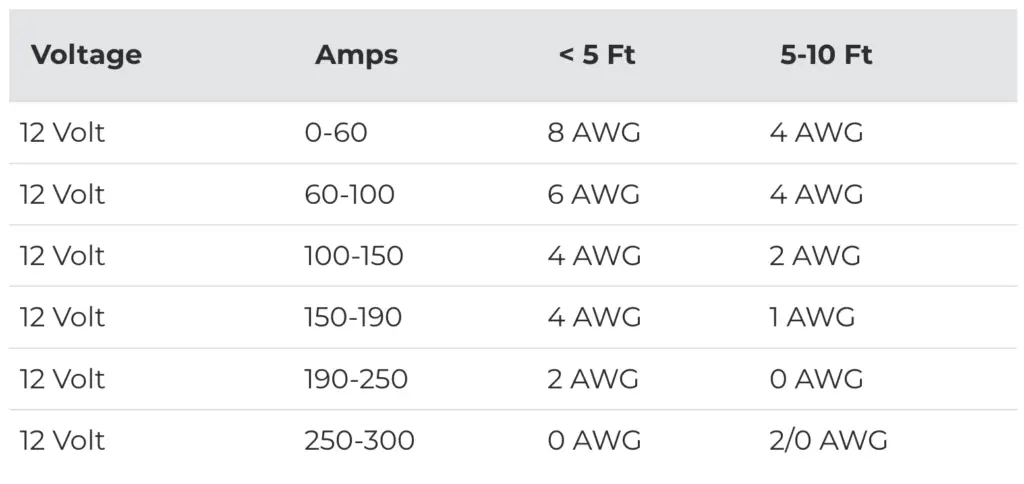
For optimal conductivity, you should use copper wire (OFC) when doing a big 3 upgrade. Aluminum is cheaper and is a popular choice of wire to use, but it is not as conductive.
Alternatively, you can buy copper/aluminum wire (CCA) or welding cable. If you go with this option, get 2/0 AWG it’s the same as 1/0 AWG OFC audio wire.
If you’re unsure about how to source your wire, here are a few options:
- Buy individual lengths of wire from your car audio store
- Buy a big 3 kit, which comes with the specific wires and connectors.
Recommended Parts
Kits:
- 1/0 Sky High Car Audio OFC or CCA wiring kit
- 1/0 AWG GP Audio OFC kit
Cables:
Lugs:
Fuse holder:
Make sure to purchase the copper lugs that are needed, especially if you are buying loose wire and not a kit. Loose connectors can be crimped using a hammer crimp or blowtorch and solder.
If you can wiggle your connector when it is crimped, then it’s not tight enough.
Before you start your upgrade, disconnect the negative battery terminal. This will ensure that you don’t short out anything during the upgrade.
Then, make sure you know where the alternator, engine, and battery are. Every car is different, and these may be in different places than what you’re used to.
These can be a bit challenging to find, depending on the layout of your car. But it is best to find them first so that you know what you are dealing with and can get all the tools you’ll need.
Next, find where all the existing wires connect and run. This will help you decide how you’re going to run your new wires and where you’re going to connect them.
Charging Wire
When you install the charging wire, make sure it is wrapped of split loom or tesa tape. This will protect it against short circuits and heat.
Take your wire and connect it to the positive battery post and run it to the factory ring terminal on the side of the alternator. Be careful not to run it along a route where it may be in contact with moving or hot parts of the engine.
A good idea is to fuse the wire close to the battery, to prevent it from getting damaged. If the wire does get damaged, it will blow the fuse and the factory wires will continue to work.

You may be thinking, ‘why are we bothering with the alternator? Doesn’t all the power come from the battery?’
That is partly true.
The battery is responsible for starting everything up when you start the engine. But as soon as you start the engine, the alternator charges the battery and provides power to all the car’s electronics when the car is running.
But if you have an 80amp alternator, you’re gonna get 80amps. No matter the size of your wire.
Battery Ground
Next up, we need to connect a ground wire to the battery and chaise of the car. Try and keep your ground wires as short as possible.
Place your wire under the ground strap of the already existing ground wire on the battery.
The best option is to connect the ground wire directly to the body of the car on top of the already existing ground wire.
If you see an easier route to ground your wire, go ahead and use it. Remember to ground it directly to the body of the car, doing this will ensure a long-term connection.
If you choose a new spot, make a small hole, remove any paint, and clean it. The upgraded, larger wire must have direct contact with the chassis.
Engine Ground
The last wire is the engine ground. This is similar to the battery ground but runs from the engine block’s ground strap to the chassis.
Connect your wire to the ground strap and then ground it on the chassis. Like with the battery ground, you can either ground it in the same place as the existing ground wire or choose your own.
If you choose a new grounding area, make sure to remove any paint so that the upgraded, larger wire has complete contact with the chassis.
If your car has a ground wire running between the alternator and chaise, go ahead and upgrade it while you are at it.
For more on AWG wire sizes, check out this Car Audio Wire Gauge Guide.
Other Things To Note
Nothing ever goes straightforward, but as long as you follow the step-by-step guide, you should be fine. Always keep in mind, however, you may need to make some minor adjustments like:
- Drilling a slightly bigger hole
- Shaving down a screw to fit the bigger wire
- Shortening your wire
- Crimping your connectors
Be sure to set aside enough time so that you are not in a rush or under pressure and you can do a good job. The Big 3 Upgrade is a really easy procedure that you can do yourself, just make sure you understand what needs to be done and what you’ll need before you start.
The Big 3 Upgrade – First Step For Upgrading Your Car Stereo Equipment
As you now know, the Big 3 Upgrade should be the first thing you do to improve not just your audio equipment, but your entire electrical equipment throughout your car.
Once you have completed the job correctly, you will be set to upgrade any factory settings in your car, including some high-performance car speakers, a subwoofer or two, and a powerful amplifier to push everything. It will improve your wifi signal if you intend making your car into a wifi hotspot, too.
Getting some high quality audio components will enhance the soundscape of your environment, and now you’re all set to improve everything.
Remember, the reason for doing it is to upgrade your system, so if you need any other advice, check out my reviews and other blog articles to help improve your car audio system.
Have you done a Big 3 Upgrade? How did you find it? Please leave a comment in the comments box to share your experience and help others out. Thanks.

I am a passionate and skilled car audio enthusiast with 15 years of experience in the industry. My journey started when I replaced my first set of factory car speakers, sparking a deep love for high-quality sound. Since then, I have worked as a representative for renowned brands like Kenwood and Alpine.
With a background in both retail and distribution, I have developed a comprehensive understanding of the car audio market. Currently a certified (MECP) installer in the Mobile Electronics industry, my expertise lies in delivering top-notch audio installations. My knowledge, coupled with my genuine passion, makes me the go-to professional for all car audio needs.
Running 1600 watts total on 2 amps (400 watts 2.5 ohm on 4 channel, 1200 watts 1ohm on mono channel).
Both amps will be in the trunk and the battery is in the front.
What gauge wire should I use for the amp kits (4 channel and mono channel), speaker wire, sub wire? as well as grounds.
Was thinking 0 gauge to Distribution block to 4 gauge to amps. 14 gauge for speakers. 10 gauge for subs.
What is the smallest gauge I can go using ofc for this setup?
thanks
Hi Cris,
Yes. Wire gauge calculation is fine if it’s OFC.
Getting ready to do a big three upgrade on my 2004 suburban.
Still a little confused on the whole grounding aspect. My negative battery cable has a large and small wire. I’m going to run 2 gauge ofc.
Do I replace the small wire with a larger gauge or leave it. Seems the large is grounded to the block already should I keep that. Confused
Hi Anthony,
Leave factory cables intact. We are adding not replacing.
Excellent guide! My alternator was only accessible from under the car. Worth every bit of effort!