How To Install A New Car Stereo
Not sure how to install a car stereo? Fear not, it’s not as difficult as you might think and as long as you follow the steps carefully, you will save yourself some money and learn a new skill at the same time.
Car Stereo installation only takes a bit of patience and care and as long as you have the right tools, anyone can do it. All vehicle models and car stereos are different, and it’s easier to do a straight swap for something the same size.
But with a bit more work, it is possible to install a double DIN car stereo in an old single DIN dock and vice versa.
Before you start, however, make sure the head unit and the mounting dock you intend to buy can fit in your vehicle. You may need to carefully select them based on your vehicle model, mounting positions, and how awkward it will be, especially if you’re installing a different size DIN.
If you’re undecided about which head unit to get, take a look at Things To Consider Before Buying A Car Stereo, which looks into what modern car radios can do.
If you have your unit and you’re ready to upgrade your car audio system, however, keep going. It’s not difficult and as long as you follow the steps below, you will soon know how to install a new car stereo.
>> Guide to Buying The Right Car Stereo <<
How To Install A New Car Stereo
Before starting you need to make sure you have all the right tools and equipment for a clean car stereo installation. This includes:
Wire Strippers
Wire Crimpers
Plastic Pry Tools
Nut Driver
Screwdriver Set
Zip Ties
Butt Connectors
Stereo Dash Kit (Better to look for vehicle specific)
Wiring Harness (Probably come with Dash Kit)
Radio Removal Key
How To Install a Double DIN Car Stereo
Installing a Single DIN or Double DIN Car Stereo is a similar process. There are a few things that you have to do differently, but basically it’s the same job. If you’re installing a Single DIN car stereo, there’s a few extra steps after these instructions, but everything there will be on your Dash Kit instructions anyway.
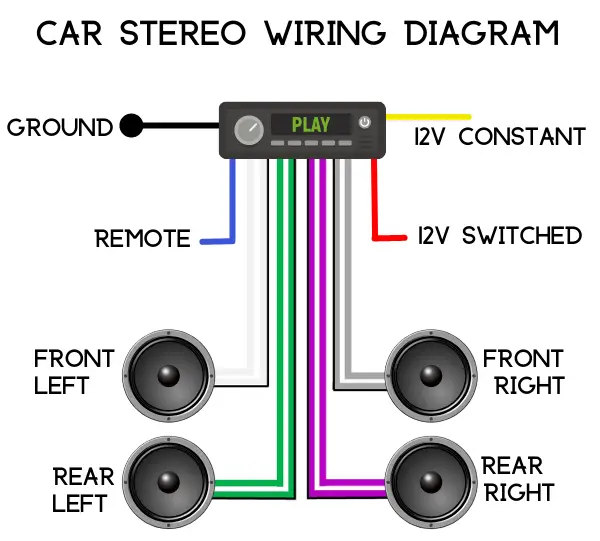
Before you start, see this simple car stereo wiring diagram. The colors of the wiring harness are regular throughout the audio industry, although some brands may change them slightly.
Depending on the features of your car stereo you may have more wires than the car stereo wiring diagram, but if so, just check the installation manual for a full explanation.
It’s a good idea to familiarise yourself with all wires before you get going. The orange illumination wire isn’t on this wiring diagram, because you don’t have to connect it. If you choose not to connect the illumination, it’s a good idea to cap it off so it doesn’t accidentally touch something behind the car stereo when you put it all back together.
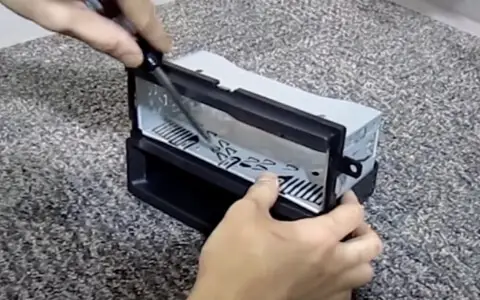
Removing The Factory Head Unit
First thing you need to do is disconnect the battery on the negative side.
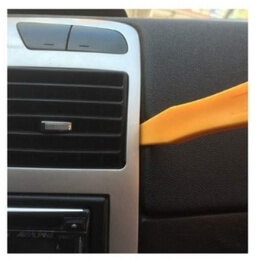
Then you want to remove your factory head unit. All cars are different, but you’ll need the pry tools to prize the panel away from its location. Get your pry tools behind the lip and feel for any resistance points and prize the panel off. Go around the whole panel until each resistance point is free and your panel is off completely.
If things get awkward and you have the owner’s manual, you should have instructions in there for how to do it.
Your factory head unit will be screwed onto the factory mounting dock, so you should unscrew them to release it.
Then you want to slowly prize out the factory head unit until you have it fully out and you can see all the wiring at the back. Some manufacturers don’t use screws to hold stereos in place, and if yours isn’t you might need to get a Radio Removal Key to prize the stereo out.
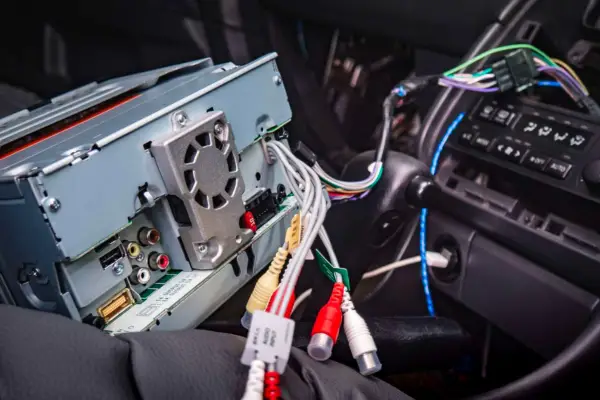
Then unplug all the factory connections from the back of your factory stereo unit, such as any antennas, and the stereo wiring harness and remove it completely.
If you are replacing an old single DIN head unit, you might have to cut some part of your old mounting dock. It all depends on your vehicle’s factory car radio. If you do have to, a sharp Stanley knife or maybe a Dremel to cut whatever you need out.
Preparing The Stereo/Mounting Kit
The next step is to put the dash kit together. Again, all car stereos will be different and installing a Double DIN head unit, you should have at least some side mounts to help fix it in securely.
Mounting kits are different depending on the model and car it’s going in, so consult your manufacturers manual. As well as the mounting bracket, you might even have to utilize the old factory mounting brackets and screw them onto your head unit. It will tell you exactly what to use in your car stereo installation manual anyway.
If you have to use a Vehicle Specific Dash Kit, it’s a good idea to fix it in now so you can mount your stereo into the dock. Consult your guide for the Dash Kit how to do this as each one is different.
Then make sure you screw all necessary mounting brackets onto your stereo unit, so it’s ready to slide in when you’ve prepared the rest of it.
Preparing The Wiring Harness
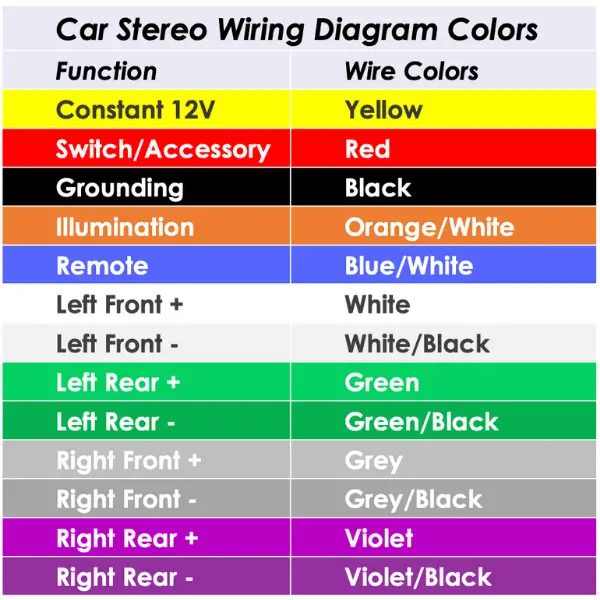
Your new car stereo, or dash kit, will come with a wiring harness, and this will need to be prepared so you can connect it with your vehicle’s harness, which means matching the colored wires from your stereo to vehicle harness.
To do this, strip the insulation using wire strippers. Cut the insulation off, leaving enough wire to connect to the butt connectors. Make sure you choose the correct gauge setting on your wire strippers as you’ll cut into the wire if you use the wrong setting.
TIP: It’s a good idea to twist each exposed wire so it slips into the butt connector easily enough. If you don’t you might get strands making it difficult to put the wire into the butt connector, or the wire won’t sit in correctly and you won’t get a solid crimp.
Once done, slip it into the butt connector, get your wire crimpers and squeeze the butt connector so you crimp it and get a solid grip.
Do this with all your wires on your harness. Match the wires and crimp both sides of the butt connectors so the harness is fully secure.
If you have any orphan wires that have no matching color wire, just terminate the end with either a butt connector or a crimp cap, just to cap off the wire and so no live wire is exposed.
Once done, make sure you uniform the wires together with a couple of zip ties, then you’ll know you won’t have any stragglers getting in the way.
If your factory stereo doesn’t have a harness, take a look at this in-depth guide on How To Install a Car Stereo with no Harness.
Mounting Your Car Stereo
Now, get your pre-wired harness that you’ve just prepared and connect it with your vehicle harness. It will plug directly into the back of your car radio unit. Make sure you push the fittings right in so they click in place.
Then connect the AM/FM antenna into the back of your head unit. If you have any other leads such as a back-up camera, RCA plugs or any other external devices, now is a good time to plug them in.
If everything is fixed in securely, it’s a good time to test your stereo. To do so, re-connect the battery, switch on the ignition and see if your new colorful Double DIN head unit lights up. test everything before you screw everything up.
If all looks good, slide the car radio unit into the mounting dock until it locks into place. Mounting docks usually line up, especially if you have matched your purchase with your vehicle model, so make you you drive all the screws in securely.
Once it’s tightened in, you just have to reassemble the panels on the Dash Kit. Just put it on and push it back into place, making sure you click all the resistance points down so it fits securely. If anything needs screwing, obviously screw it down.
And that’s it, you have just installed a Double DIN Head Unit without paying someone else to do so.
How To Install a Single DIN Car Stereo
Car stereo installation, whether it’s single or double DIN is a very similar process, unless you’re installing one in the place of an old double DIN receiver. In this case, it’s just the Dash kit that needs a bit of extra work.
The mounting kit will have everything you need for your model car, and just make sure the mounting holes line up with the existing screw holes so it all lines up nicely.
Your mounting kit will have a Fitting Cage which you’ll need to slip into place through your mounting kit and press down the A shaped tabs with a flat head screwdriver to grip the cage to the mounting kit.
Then slip the car radio fully into the cage and make sure it clicks and is secure. If so, leave it like this and just mount it together, once you’ve completed the wiring harness and are ready to install it.
Click the link for a step-by-step on how to install a single DIN into a double DIN space.
You Don’t Need To Pay Someone To Install A Car Stereo
Car Stereo installation isn’t only for the professionals. Sure, a single DIN to double DIN is a bit more awkward, but it’s not as difficult as it seems.
Arguably, the trickiest part is making sure you get the right head unit. Not all car stereos systems are universal and many car manufacturers don’t want you replacing their models and are trying to make it difficult to replace factory car radios.
As long as you have the right tools in place, however, and you follow the step-by-step instructions, you can quickly learn how to install a new car stereo, and you will soon have many more gadgets at your fingertips.
Have you installed a car stereo? How did you get on with the stereo brand and model car? Please leave a comment below and help the community with any tips from your experience… Thanks.

I am a passionate and skilled car audio enthusiast with 15 years of experience in the industry. My journey started when I replaced my first set of factory car speakers, sparking a deep love for high-quality sound. Since then, I have worked as a representative for renowned brands like Kenwood and Alpine.
With a background in both retail and distribution, I have developed a comprehensive understanding of the car audio market. Currently a certified (MECP) installer in the Mobile Electronics industry, my expertise lies in delivering top-notch audio installations. My knowledge, coupled with my genuine passion, makes me the go-to professional for all car audio needs.
I recently installed a head unit, but it keeps resetting every week or so. Do you know why this might be happening?
Check your ground connection. If it’s not right the signal will be intermittent and the head unit will take it as a loss of power and it’ll restore itself to the default factory settings.