Sound Deadening Spray – Improve Your Car Acoustics
We all want a nice quiet interior while driving our vehicles, and car soundproofing is a great way to achieve that. But what about sound deadening spray foam, does it work? Is it as good as sound deadening material?
Fitting out your interior with sound deadening mats can be expensive, not to mention the hassle of it all, so using soundproofing spray foam instead is another option.
It is much easier to use than the mats or rolls of sound deadening material, but how does it work? Is it comparable with mats? And how easy is it to install? For more information read on…
Why Soundproof Your Car
Well, first and foremost, you can’t soundproof your car, but you can deaden, or dampen the unwanted noises that come along with driving a 2 ton vehicle.
The term ‘soundproofing’ is commonly used instead of sound deadening, or sound dampening. While you might be able to soundproof a room, you can’t soundproof a vehicle, because noise energy will always leak in and out of your windows even if you soundproof everywhere else.
But “sound deadening” your car is a great way to eradicate much of the noise and rattle you have to put up with while driving your car. It will deaden those unwanted noises that your car stereo has to compete with, and yes you’ve guessed it: improve the clarity and volume of your music.
With car soundproofing, most people install mats, but that can be awkward to anyone who hasn’t tried it before. This is where sound deadening spray comes in: it’s much easier and quicker to get the desired results.
What is Sound Deadening Spray for Cars?
Sound Deadening spray is a liquid compound that comes in a handy can or a bigger tub depending on the amount you buy.
The spray liquid is made of sound deadening particles that are mixed with fluid rubber or vinyl sheets, which results in excellent sound absorption and heat resistance, once dried.
It’s effectiveness will depend how many times you spray it, but it’s recommend to spray at least 2 coats, ensuring you give it an even as possible application everywhere.
It is easier to apply, especially for those tight areas and will help reduce vibrations and eliminate external road noise, and regulate the temperature of your cabin.
Not only will it improve your sound system, it will protect your car from corrosion and rust that all vehicles are prone to over time.
You can use it to cover the full interior of your vehicle, or you can use it along with sound deadening mats to ensure you have covered everywhere the way you want to.
Any can or tub, once placed in your spray machine is ready to apply to hard surfaces and forms into a sound deadening material and insulator once dried.
If you use soundproofing spray foam instead of mats, it will save you a lot of time, and because it’s cheaper, you’ll save yourself some money, too.
How Does Soundproofing Foam Spray Work?
Soundproofing spray works in the same way as the mats. It cuts the noise of any rattle or vibrations that come while driving your car.
Sound deadening reduces these vibrations by adding sound absorbing material to the surface. Without it, any loose objects in your car, and there are many, are free to vibrate against metal or plastic.
Therefore, curbing the vibrations reduces unwanted noise that we all have to put up with unless we choose to apply sound deadening.
It also helps reduce any noise made from the exterior by absorbing the noise energy that infiltrates any exposed cabin that lacks sound deadening material.
Sound Deadening Spray Foam vs Mats
Sound Deadening spray foam is the new kid on the block for anyone wanting to soundproof their car. As we know, it’s much easier to apply the foam spray, but is it as effective as the sound deadening mats?
Mats are thick and heavy, and they can be awkward to cut and install, especially the hard to reach areas. Sound deadening sprays, however, are easy to install and are perfect for those awkward, hard to reach areas.
You should apply at least 2 coats, but you can spray multiple coats, and of course, the more you spray, the better your sound insulation will be.
As well as improving the cabin acoustics, when applied to areas such as the car hood, the spray’s elastic texture will protect it against all the elements. And along with the rest of the metal surface you cover throughout your car, it will be protected from rust and corrosion.
Mats are of course great for sound deadening, and to be honest, I would use them for the majority of my car soundproofing job.
That said, any tight area that you can’t get behind with mats should be covered with sound deadening foam for the best results, and is better for areas such as the exhaust or under the hood.
The main advantage sound deadening spray has over mats is the speed of application and price. But as already stated, if you want the best sound deadening result, use both.
How to Apply Sound Deadening Spray to a Car
Whether you’re doing the whole interior with a sound deadening spray or you’re using it along with some mats, the job is pretty much the same.
Depending on the brand you get, the application instruction may vary slightly so read the instruction label before you start.
When you intend to use sound deadening spray, you should make sure you have all the protective gear, because the fumes can be damaging to your health, so get a good quality respiratory mask and some protective gloves.
You should also get some masking tape to protect those areas you don’t intend to apply the soundproofing spray foam. Use the masking tape with some old newspaper to cover the bigger areas you don’t want to spray.
Depending on the brand and the size of the tub you get, you may need a paint sprayer and mixer. These come with some packages and are necessary, unless you get the can of course.
Applying Soundproofing Spray Foam to a Car
First you should remove any panels, carpets and car seats that are in the way of the area you want to apply sound deadening spray to.
Once you have removed everything, you need to prepare the surfaces, you’ll be spraying the sound deadening material on. Clean everywhere with a water-based cleaner and then use some rubbing alcohol on all metal and plastic surfaces that you will cover.
If you have any rust on the bare metal, you should sand it down and apply some rust protector before doing the above.
Use the tape and newspaper to cover all surfaces that you won’t want to spray as it can be very awkward to get off.
Now you want to prepare the sound deadening spray. If you have a tub that needs mixing, make sure you give a good mix with the paint mixer for about a minute to ensure all the particles are evenly distributed. Then pour it into your paint sprayer.
If you have a can of sound deadening spray foam, give a good, rigorous shake for about 1 minute before applying.
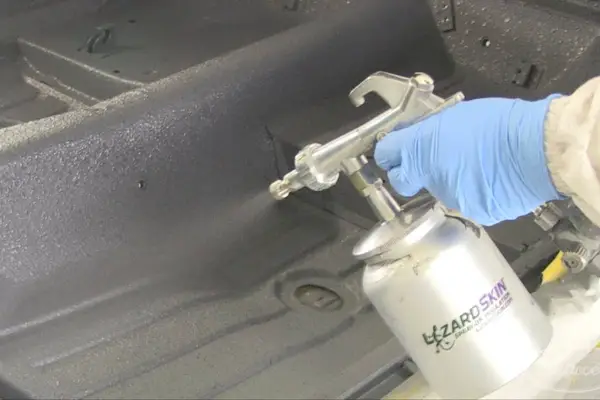
Now you’re ready to apply the soundproof spray to your car. Your product will come with instructions, so read them, but basically you should hold the nozzle about 12 to 18 inches away from the surface.
Press the spray lever/button to apply the liquid and move in even strokes from left to right, gradually moving up or down as you go to ensure you give everywhere an even covering.
From time to time, give your can or sprayer another good shake to ensure the particles haven’t all rested at the bottom.
Once you have coated the entire surface, you’re done, but of course, this is only one coat. It is recommended to apply at least 2 coats, and the more coats you apply the better your sound deadening will be.
For any additional coats, you should wait until the previous coat is dry, and the time varies between different products. The information label on your product will tell you how long to wait.
Once you’ve finished it’s time to clean your equipment. A spray can is probably best not to keep, but if you want to keep it for a short while, it will be fine. Any paint sprayer can be cleaned with some cleaning solution.
When you have completed the full sound deadening spray application and you’re happy with the job, it’s time to reassemble the car interior.
Remove any newspaper and masking tape. Then it’s time to put back any panels, seats and carpets that you removed before starting the job.
Congratulations, You’ve Just Improved Your Car Sound Insulation
We all want the perfect environment for listening to music, but driving a heavy vehicle isn’t exactly a recording studio.
And while you’ll never get an absolute soundproofed car, you can eradicate much of the noise that comes with driving a vehicle.
Whether you used sound deadening spray or mats or both, you will have improved your car acoustics. Now it’s time to enjoy your newer and clearer soundstage.

I am a passionate and skilled car audio enthusiast with 15 years of experience in the industry. My journey started when I replaced my first set of factory car speakers, sparking a deep love for high-quality sound. Since then, I have worked as a representative for renowned brands like Kenwood and Alpine.
With a background in both retail and distribution, I have developed a comprehensive understanding of the car audio market. Currently a certified (MECP) installer in the Mobile Electronics industry, my expertise lies in delivering top-notch audio installations. My knowledge, coupled with my genuine passion, makes me the go-to professional for all car audio needs.