How To Soundproof A Car
Car soundproofing is an excellent way to dampen the vibrations of your car and enhance the acoustics of your audio. Any untreated metal in your car will resonate, and any loose components without treatment from sound deadening material will cause vibrations that compete with your acoustics.
Getting some aftermarket speakers, an amplifier and subwoofer are first and foremost the best ways to improve your sound quality. However, if you really want to create the best atmosphere in your car, sound deadening material will add more clarity to your already pristine car stereo set up.
Sound Proofing, Sound Dampening, Sound Deadening, which is it? Well, no vehicle can be soundproof, but what people call car soundproofing they tend to mean sound deadening or dampening.
It comes in rolls or mats, and we at SoundRating recommend mats as they’re easier to work with. Applying some sound deadening mats to the areas of your car that cause the resonance will dramatically reduce it and enrich your listening experience.
And as long as you apply sound deadening to at least 25% of the area you want sound proofing, you will make a dramatic improvement to the atmosphere in your car and the stereo soundstage will receive a drastic improvement.
What Is Sound Deadening and How Does It Work?
Sound Deadening isn’t exactly soundproofing your car. A vehicle can never be fully soundproof, because you will lose some sound out of the windows and other places where you can’t put any deadening material.
Sound Deadening dramatically cuts down on the noise your car makes from vibrating, so your car audio isn’t competing against vibrating noises, and other airborne noises from the road.
The material is usually made up of butyl rubber and a metallic backing such as aluminum. The first layer of butyl rubber helps reduce the vibrations, while also acting like a decoupler for any loose components that rattle against other parts.
It works by absorbing the energy from the vibrations produced by the car and converting it into silent energy. Ultimately, this reduces the unwanted sounds that travel through your car and improves the acoustics of your sound system.
There are different thicknesses, and the thicker it is the more resonance you will cut out. But you should get two different sizes if you intend to cover most of the car and you want proper sound insulation.
This is because the thicker sound deadening material will be too big for some of the tight areas, so you’ll need some thinner mats to get in behind any tight squeezes.
It’s important to note that you don’t need to cover every inch of your car or even the area you’re adding sound proofing to. As long as you get behind any part that vibrates and any thinner, hollow metal and plastic on your car, you will make a huge difference.
You can also get sound deadening spray, which can be used all over, but isn’t as effective as the mats. However, it is better for getting in those tight areas, so getting some spray foam will ensure you achieve the best results.
How Much Sound Deadening Material Will I Need?
Of course, every sound dampening installation is different so you need to measure the total surface area you will be installing.
You don’t have to cover every inch of the surface area, but the more you cover the more resonance you will cut out.
You must cover at least 25% of the surface to have a big impact, but if you really want to “soundproof your car” I would go for at least 75% coverage.
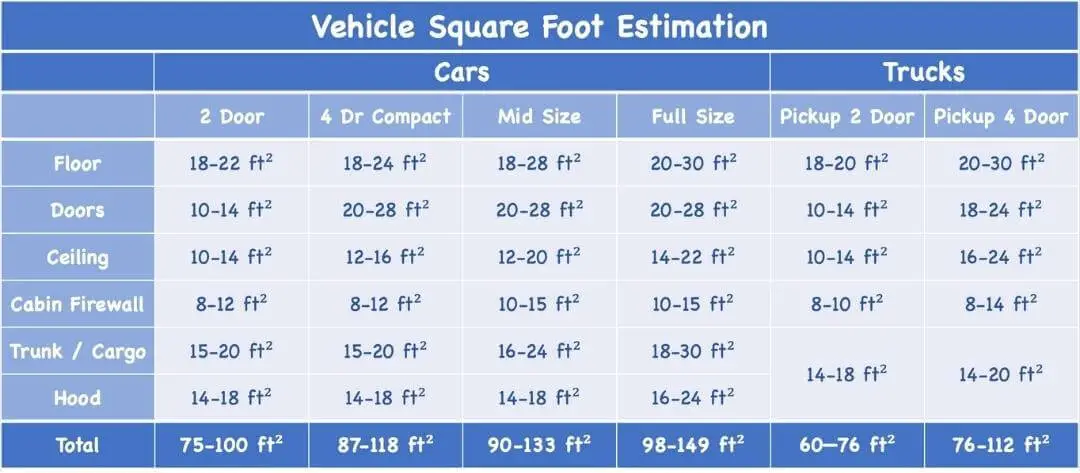
For a size estimation for standard vehicles check out the chart below, but these are estimations and you should really measure it yourself.
Tools You Will Need
- Boxcutter
- Wooden Roller
- Rubbing Alcohol
- Workman Gloves
- Trim Removal Kit
- Leather Hole Punch
- Clear Vinyl Transfer Tape
- Self-adhesive Sound Deadening Mats (Dynamat is the best, but many cheaper brands will also do a good job)
How To Soundproof A Car
First thing you should do is disconnect the battery by the negative terminal. You won’t be touching much of the electrical wiring, but it’s always good practice to do so.
The installation process will vary from car to car, but the following step-by-step guide for how to soundproof a car has the same basic outline for all vehicles.
If you need any information about vehicle specific stuff, refer to your user manual or check online for any irregular obstacle you come across.
For this installation guide, we will cover the car doors, floor, and trunk. You can do all parts of the car, including the firewall, hood, the headliner (roof), and even the registration plate if you really want, but the areas we’re covering are the ones that make the most impact to your car acoustics, and so are the most common to give sound treatment.
Soundproofing The Car Doors
Start with the car doors as this is the most common place people tend to soundproof.
First you need to take the OEM door panel. For this you may need some pry tools and a screwdriver. Of course all cars are different, and if you are struggling with removing your panel, just look on YouTube for your specific car.
After removing the door panel, you may come across a sound insulation panel. This isn’t in every car, but if it’s in yours, simply peel it off, or unbolt it if it’s solid material.
At this stage you’ll also want to remove the speaker, and unplug any wiring harnesses that might be in the way. It’s a good idea to take a screenshot before you remove anything just so you know exactly where everything goes afterwards.
Once you have access to the inside door, the first thing to do is clean it with some Rubbing Alcohol. Simply wipe it all over with a rag and the alcohol to remove any grease or dirt.
With all areas you can apply acoustic caulk to the corners to give even more sound dampening. It’s not necessary, but if you choose to do this, you should do it first, after you have cleaned each part. But remember the acoustic caulk takes a while to dry.
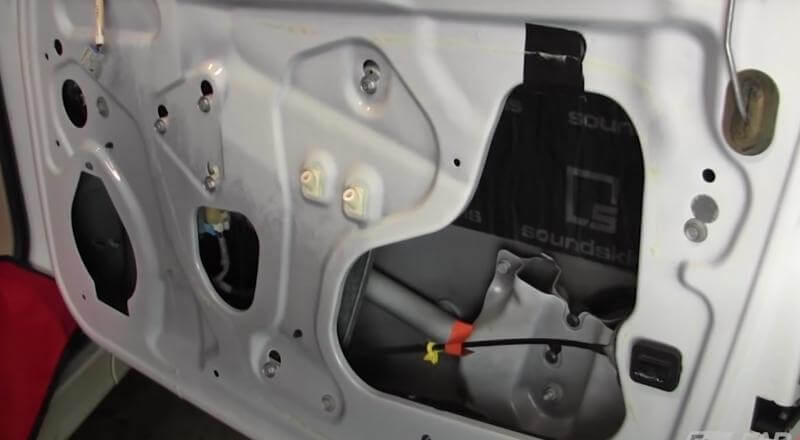
There are three main areas to each car door that you’re going to soundproof.
You can see the two main metalic areas that need sound insualtion here in the image above. The main area is the white colored sheet metal in the image that you see. The outer sheet, which is behind the openings for the speakers and other levered parts also needs deadening material, and although it’s a bit more awkward, you really should apply some here.
Do this area first and don’t worry about the this area being a snug fit, because getting right in to measure it is pretty much impossible anyway. Simply cut a few squares of the sound deadening mat and apply it.
To do this, remove the first few inches of the protective backing and then with your hand move along, sticking it down as you remove the rest of your backing. Then with your wooden roller, firmly roll it out, so you’re pushing the sound deadening material against the metal. This will ensure your mat is stuck firmly.
Just make sure you have covered enough of the solid sheet metal that makes up the outer door panel, especially behind the speaker area. This will reduce the noise of the vibrations and help block a lot of road noise that can overwhelm your speaker’s acoustics.
Now it’s time to do the inner door skin (metal). This is where much of the vibrating noises your car doors will make, as components such as the locking mechanism will vibrate against the sheet metal.
For the inner door skin, you could apply several smaller rectangles, or for a neater job, you could make a stencil by tracing the outline of the cut on some transparent transfer tape. This will make it easier to know exactly where to cut out any bolt holes or other obstacles.
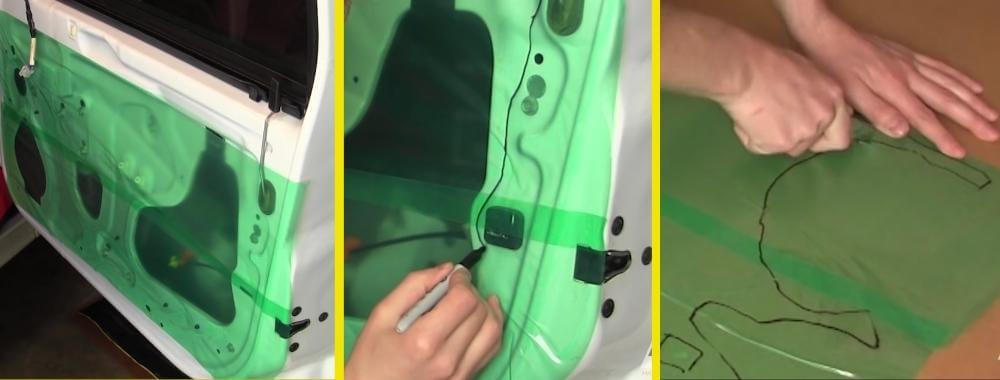
With the clear vinyl transfer tape you want to cover the entire surface of the inner door skin and stick it on with some masking tape. Then with a marker draw around the shape you want to make, ensuring you include all protruding obstacles that the deadening mat will need to go around.
Now you have your template to cut your your mat. You can do this on cardboard first to make a sturdier and permanent template, or you can simply stick the clear vinyl transfer tape onto your deadening material and cut around the template lines.
To do this, get your boxcutter, and cut the main outline as in the picture above. Any of the awkward to get to holes can be done with the leather hole punch.
Once you’ve cut the deadening mat you’re ready to stick it on. As before, apply the same method for sticking the sound deadening mat down by removing part of the protective backing and sticking it down on to the inner door skin. Again, use the wooden roller to make sure you adhere the soundproofing mat to the sheet metal, ensuring you roll out any air pockets. You can now wire the speaker back in place.
You won’t cover 100% of it, but any parts that potentially vibrate against the sheet metal should have some deadening material behind. So, any that are tight and you couldn’t get behind with your template, cut small pieces to fit and squeeze them in before giving them the wooden roller treatment as best you can.
Don’t worry if you have some metal exposed as sound insulation everywhere is impossible. You only really need to get the thinner sheet metal and behind any components that could potentially vibrate that will make the biggest impact.
Now it’s time to sound treat the plastic door panel. The door panel is made of flimsy plastic that’s prone to vibration, so you want to make sure you put sound deadening material on the larger, flat parts that aren’t. as strong. Any solid, protruding parts, don’t necessarily need it and putting deadening material here could prevent you from getting your panel back on.
Now, locate any component, such as any wiring harness or clips that could vibrate against the plastic. Then cut out a small piece of deadening mat to put behind it.
This decouples the wires from the hard surface so when they vibrate, the sound will be nullified. If you need to use thinner material for these parts, that’s why you have some.
Now you want to cut out small strips and roller them onto your plastic door panel, making sure you cover any of the flimsy plastic that could potentially rattle.
Remember, if there are any parts on each panel that will be very close to the sheet metal, you can always use the slimmer deadening mat you have. It doesn’t all have to be same thickness, because all you’re doing is getting rid of the resonance, and all deadening mats, no matter how thick will work on that together.
Also, you don’t need to, and can’t, put the deadening material everywhere, because it could prevent you from getting your panel back on. So, any firmer bits of plastic or metal, such as the curved beams that protrude, this is where there will likely be a very tight fit and because it’s firmer material, you won’t get much vibration noise from it anyway.
Once you have all the flimsier plastic of the panel, including underneath any loose components, you’re done. Now, simply reassemble the door panel, making sure you replace any bolts or clips to secure it properly.
You can go around the edges and joints with sound insulating tape to neaten the job up if you like, but this ins’t necessary as it will all be covered anyway. Congratulations, you have just sound treated your first car door. Now it’s time to apply sound insualtion to the trunk.
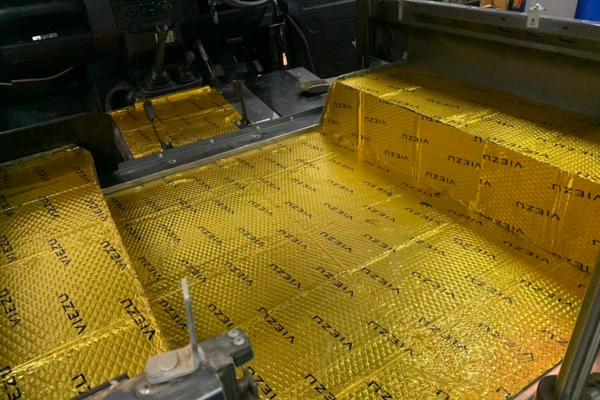
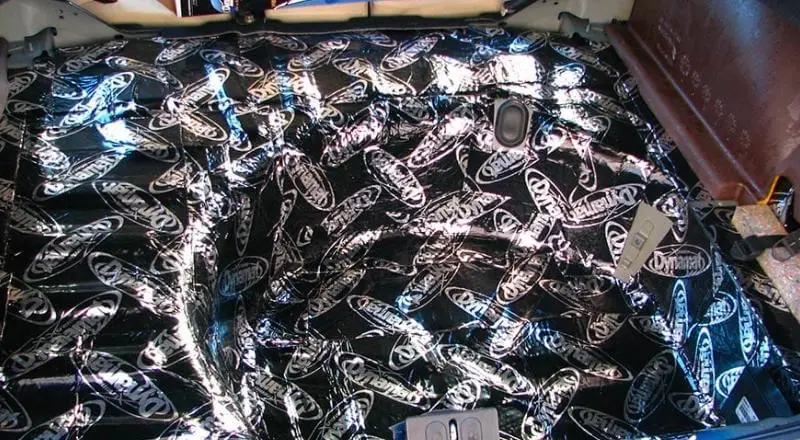
Car Soundproofing The Trunk
The trunk area is responsible for a lot of resonance and vibrations. The exhaust and the wheel well are the two most guilty parts, but the trunk floor also resonates more than much of your car.
When soundproofing the car’s trunk you first need to remove all the interior. The carpet is usually fit with panel pins so getting the right panel pin remover will ensure you do a clean and thorough job of removing the carpet. Then move any side panels, and once these are removed, you’re good to go.
Then, it’s the same process as the car doors. First, clean all the sheet metal with some rubbing alcohol to make sure you get rid of the grease and oil.
Now it’s time to apply the sound deadening mats to your trunk area. Pay particular attention to anywhere the sound system is. Such as any speaker holes, take them out and apply some deadening material behind them.
Also, if you have a subwoofer in the trunk, ensure you install some nice thick deadening material under the area your subwoofer enclosure will be located. This will help dampen much of the vibration caused by the subwoofer and floor combined and clean up the quality of your bass reproduction.
The floor of the trunk resonates, so as well as the subwoofer box area, it’s a good idea to apply it all over. For the wheel well, you could use the spare tire as a template for the bottom section. Then for the vertical part, you should cut strips about 5 inches wide so you don’t get any creases on the rounded parts. This bit is hard to cover neatly, so you may have to cut more smaller strips to ensure you cover it all.
Another good place to soundproof is under the rear deck. In many vehicles, car speakers are located here, so getting some soundproofing material under that is always a good idea.
As with anywhere with your car soundproofing job, you can apply some acoustic caulk in the corners and over the joints. It’s not essential, but it will add a little bit more soundproofing to your car.
Once you’ve done with your trunk you need to reassemble the carpeting and side panels of the trunk, and you have completed the next part to ensure you get the best car sound.
If you like, you can place some sound dampening material on the lid of your trunk too. Everywhere vibrates to a degree, and even if it has no loose components rattling against it, dampening the vibration of the hood’s metal will make a difference. However, I would do this part last, so you know you have enough for the rest of your car soundproofing job.
Once you’re done with the trunk, you’re good to move onto soundproofing the car’s interior.
Soundproofing The Car Floor
Now it’s time to soundproof the floor and interior of your car. The process is pretty much the same as the trunk, but obviously you have different parts in the way.
First you want to remove the car seats. Every car is different but basically, they just need unbolting and pulling out. Again, if you’re having any problems with this, check out YouTube for a vehicle specific video on how to remove car seats.
Once done, you want to remove the trim. For this you just need a pry tool to get the first bit released and then pull the rest of it out. Now, you can remove the carpeting so you have access to the sheet metal.
Now, it’s a similar process to the trunk. Clean all the sheet metal with some rubbing alcohol to make sure you get rid of the grease and oil.
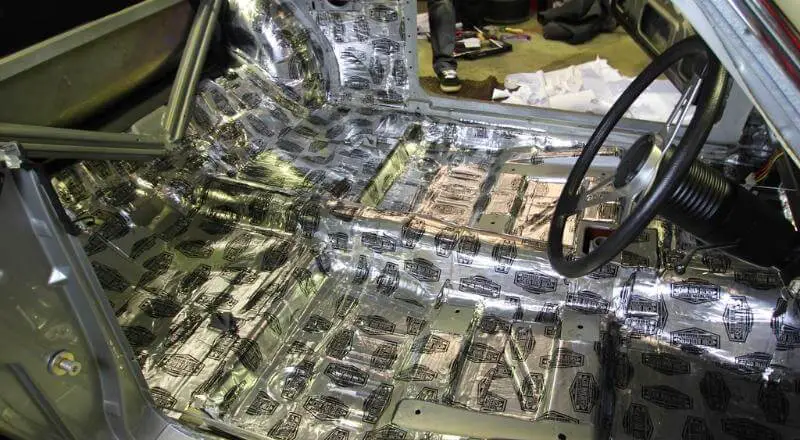
Now you want to apply the sound deadening mat to the main floor area. Any tight bits behind any wiring harness you can cut out smaller pieces, and if need be use the thinner sound deadening material. Also, make sure you cut around any bolt areas.
You can apply sound deadening material all over if you like. However, some areas such as the plinths the car seats are attached to are sturdier and they will be a tight fit when you replace them, so bear that in mind if you want to cover everywhere.
Once this is done, you can reassemble the carpets, sidepanel, and then bolt the seats back in place. Congratulations, you have just done your first full car soundproofing job and your acoustics will now be much improved.
A good video guide for installing Sound Deadening to your car
Car Soundproofing – A Way To Enhance Your Car Acoustics
Sound soundproofing seems like an awkward job, especially if you’ve never done it before, but if you want the best car sound stage, it’s a job you should undertake.
It takes time, and the cost is a fair bit, but if you get some good quality sound dampening material and cover most of your interior, you might be shocked at the difference it makes.
It not only dampens the vibrations, but it also insulates the car so the exterior road noise is also dampened, and as a bonus it insulates your car during those winter months.
If you want to make the acoustics better and even make your speakers sound even louder, then sound insulation is the way to go.
Take a look at our extensive review of the best sound deadening material on the market.
Sound Proofing a Car FAQs
What thickness of Sound Deadener is best?
The thicker the better. Most of the brands do 80 mil, which is nice and thick, but the best brand Dynamat only do 67 mil. That said their 67 mil product – Dynamat Extreme – is better than any other on the market and it’s thinner.
Where should I put sound deadening in my car?
Most people start with the car doors or trunk, but the floor also creates a lot of vibration and should be soundproofed for the best car sound. You can also apply sound deadening mats to wheel arches, firewall, hood, and the headliner (ceiling) for a full and complete sound insulation.
How much sound deadening do I need for my car?
You should cover at least 25% of the surface to dampen the resonance and make a big impact with your car soundproofing. They say a 60% coverage will give you up to 95% results, so you don’t have to cover every square inch. That said, the more you cover, the more you’ll benefit from thermal insulation, too.
Does soundproofing your car increase SPL?
A car with no soundproofing will share a lot of the sound stage with the car’s vibrations and noise from the road. If you can cut this out it will definitely improve your car acoustics. You will see an improvement from the lowest bass to the highest frequencies and a dramatic increase in your SPL overall.
Does sound deadening material reduce vibration?
Sound deadening mats/material such as Dynamat reduce noise from vibration by decoupling the rattling components and your car walls and floors. It also dampens the vibration by nullifying the way the sound from the vibration can travel.
How do I remove sound deadening material once it’s stuck down?
The one drawback of soundproofing a car is the deadening mats are very adhesive, and once stuck down are hard to remove. That said, in the unlikely event you want to remove your sound dampening mats, you can use a heat gun to heat the edges and slowly pull it up.
How much sound deadening material do I need for a whole car?
Every car is different, but for the average small car you’ll need about 80 square feet. For a mid-size car you’ll need about 110 sq feet, and for a full size car you might need about 150 square feet.
Does Sound Deadening help with temperature?
Sound insulation means you insulate the car, so it will definitely help keep the car warmer. Some sound deadening brands also allow for temperature control so the material will help cool your car down in the summer, while keeping it warmer in the cold winter months.

I am a passionate and skilled car audio enthusiast with 15 years of experience in the industry. My journey started when I replaced my first set of factory car speakers, sparking a deep love for high-quality sound. Since then, I have worked as a representative for renowned brands like Kenwood and Alpine.
With a background in both retail and distribution, I have developed a comprehensive understanding of the car audio market. Currently a certified (MECP) installer in the Mobile Electronics industry, my expertise lies in delivering top-notch audio installations. My knowledge, coupled with my genuine passion, makes me the go-to professional for all car audio needs.
Thanks for this article! I’m ready to try and insulate my car, do you think Dynamat is worth that much more? It’s quite a bit more expensive than the others.
Dynamat is the best deadening product for sure, but the others will also do the job, just not as good as Dynamat. Probably the next one I’d recommend is Hushmat. This will also do a great job, but tbh, most people prefer to spend a bit more on Dynamat for its superior deadening qualities.