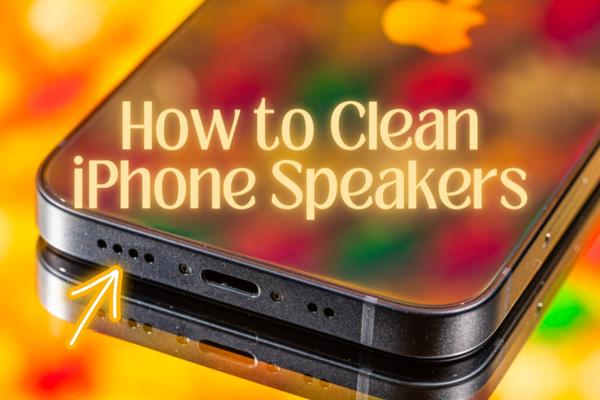
How to Clean iPhone Speakers
How to clean iPhone speakers? Maintaining the efficiency and longevity of our digital devices is an essential task in today’s tech-driven world. The iPhone is one of our most loved possessions, which is known for its advanced features, sleek design, and impressive sound quality.
Our iPhone speakers are more prone to getting dirty than we might realize. Dust, lint, and other debris can accumulate within these small crevices over time, especially considering how often we use and carry around our phones.
This accumulation can impact sound clarity, volume, and overall performance, so knowing how to clean your iPhone speakers is essential.
This article aims to help iPhone users understand the importance of clean speakers, and provide a comprehensive guide on how to clean your iPhone speakers safely and efficiently. And most importantly, it’s best to know this before you actually need to clean those hard to reach crevices.
Understanding the Structure of iPhone Speakers
Before we embark on the cleaning process, it’s important to familiarize ourselves with the structure and location of the speakers on your iPhone. This understanding is fundamental to effective cleaning and avoiding inadvertent damage.
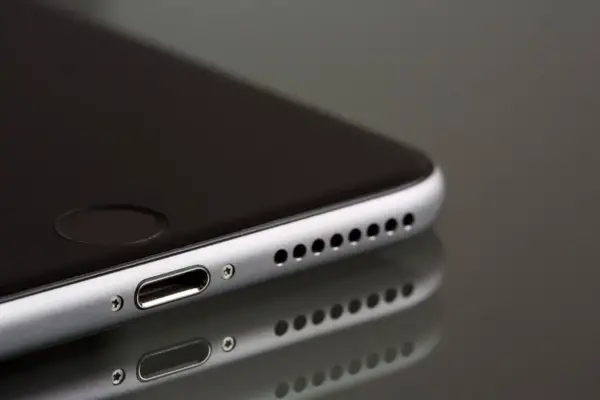
The speaker’s location and structure in different iPhone models
The structure and positioning of iPhone speakers have evolved over the different iPhone models. Earlier models such as the iPhone 4 and 5 had one bottom speaker on the right of the charging port. However, from the iPhone 7 onward, Apple introduced a stereo speaker system with one speaker at the bottom right of the charging port and a second one cleverly incorporated into the earpiece.
In iPhone 12 models and onward, the speakers retain the same general location but feature an improved design for better sound delivery. Understanding the specific speaker layout of your iPhone model will help you target your cleaning effectively.
Importance of understanding the structure for effective cleaning
Knowing where your iPhone’s speakers are located and their structure is crucial to effective cleaning. Different speaker configurations may require different approaches to ensure thorough cleaning without causing damage.
Armed with this knowledge, we can now explore the signs that might indicate your iPhone speakers need cleaning. This can guide us on when it’s time to clean and when it’s best to leave well enough alone.
Signs That Your iPhone Speakers Need Cleaning
Just like any other device, your iPhone will give you signals when its speakers require some attention. Here’s how to identify those signs.
Sound distortion
Sound distortion is one of the most noticeable signs that your iPhone speakers might need a clean-up. If you notice the sound coming out of your speakers sounding fuzzy, muffled, or crackling, it may be due to dust or debris stuck inside the speaker grills.
Lower volume output
Another common indication of dirty speakers is a noticeable decrease in volume. If your iPhone’s volume seems quieter than usual, or if you need to put it at its maximum volume to hear clearly, then there’s a good chance your speakers are clogged.
Unwanted noise during calls
In some cases, you may not notice anything when playing music or videos, but during calls, you might experience strange noises or difficulties in hearing the other person clearly. The earpiece speaker, being more exposed, is prone to getting dirty, leading to these issues.
However, before concluding that the speakers need cleaning, it’s important to rule out software issues. Check if the problems persist after restarting your iPhone and ensuring your software is up-to-date. If the issues persist, then it’s time to gather your cleaning tools and get to work.
Different Ways of How to Clean Your iPhone Speakers
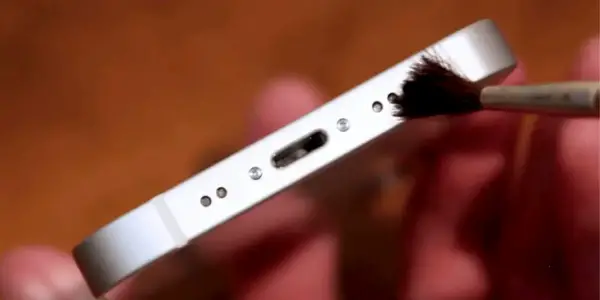
1. Use a Soft-Bristled Brush
Cleaning your iPhone speakers with a soft-bristled brush set is an approach that is endorsed by Apple themselves. Some people will use an old/soft toothbrush, and this works, but if you get a cleaning brush set, it will come with ear bud style cleaning equipment too.
- Start by detaching any protective cases or screen protectors from your iPhone.
- Use a bright light source, like the Lumify Tactical LED Flashlight and direct it into the speaker grills to assess the extent of dust or debris accumulation.
- Make sure that your brush has soft bristles, is clean, and is completely dry to avoid any potential harm.
- Initiate cleaning with the earpiece speaker, delicately brushing from one side to another, being cautious to direct the dust outward rather than pushing it further in.
- Repeat this process a few times, tapping the brush to dislodge any trapped dust between sweeps.
- The same soft-bristled brush can be used to clear the bottom speaker grills located adjacent to the charging port. Carefully insert the bristles into the grills, giving it a gentle twist before removal to extract dust and debris.
2. Use Painters/Masking Tape
Another well-liked technique involves the use of painter’s tape or masking tape. These tapes are less adhesive than other types, ensuring they won’t leave behind any residue on your device.
- Begin by removing any cases and screen protectors from your iPhone to gain unhindered access to the speakers.
- Switch on your flashlight to get a clearer view of the accumulated debris within the speaker grills.
- Carefully wrap a small strip of painter’s tape around the tip of your finger, making sure the adhesive side is facing out.
- Position your tape-wrapped finger on the earpiece speaker and roll it gently from one side to the other to gather dust. You don’t need to exert too much pressure, just enough to let the tape make contact with the inside of the speaker.
- For the smaller speaker grills located at the bottom of your device, you’ll need to shape the tape into a sharper point to effectively reach within and pick up the debris.
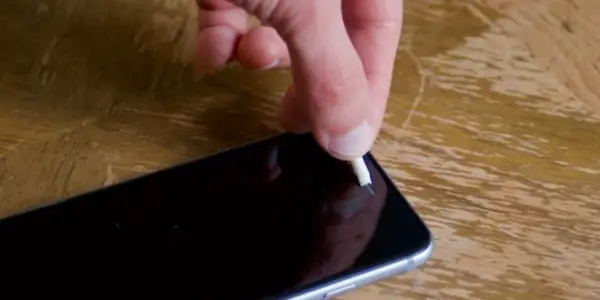
3: Use a Toothpick
Toothpicks can serve as a handy tool for cleaning iPhone speakers, but caution is highly advised due to the potential risk of damaging the internal components if misused. This method should only be applied at the user’s discretion and preferably when the lower speakers near the charging port are visibly clogged.
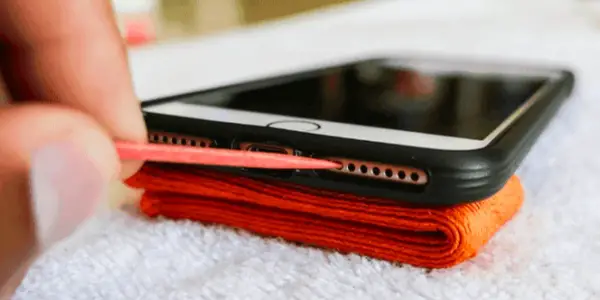
- Prepare your flashlight to give you a clearer view of your task.
- Utilizing the pointed end of a wooden or plastic toothpick, gently insert the toothpick into the speaker grills. It’s crucial to avoid applying force during this process and to stop further insertion once you meet resistance.
- Afterward, slightly angle the toothpick sideways and upward while pulling it out, helping to dislodge and eject the debris. Be careful not to tilt the toothpick downward to prevent inflicting any damage to the speaker components.
How to Clean iPhone Speakers – Conclusion
Among these maintenance activities, cleaning the iPhone speakers is often neglected. This guide has highlighted the importance of regular cleaning and provided you with three different methods of how to safely clean your iPhone speakers, keeping them free of dust and debris.
Understanding the location and structure of your iPhone speakers, recognizing the signs when they need cleaning, and using the appropriate tools for cleaning are the keys to preserving your device’s optimal audio output.
Whether you choose to use a soft-bristled brush, adhesive tape, or a toothpick, always remember to proceed with caution to avoid causing any damage. Keep in mind that professional cleaning services are also available if the task seems too daunting or the speakers are too clogged.
Taking care of your iPhone speakers will ensure that your audio experience remains high-quality and your device stays in top shape. So, arm yourself with these tips and extend the life of your iPhone speakers. Happy cleaning!
Other How Tos from SoundRating
How To Connect an iPhone and Car Radio
How to Build a Ported Subwoofer Box
How to get Apple CarPlay Working

I am a passionate and skilled car audio enthusiast with 15 years of experience in the industry. My journey started when I replaced my first set of factory car speakers, sparking a deep love for high-quality sound. Since then, I have worked as a representative for renowned brands like Kenwood and Alpine.
With a background in both retail and distribution, I have developed a comprehensive understanding of the car audio market. Currently a certified (MECP) installer in the Mobile Electronics industry, my expertise lies in delivering top-notch audio installations. My knowledge, coupled with my genuine passion, makes me the go-to professional for all car audio needs.