How To Bridge An Amp
Getting as much power into your speakers is the goal of many an audioholic, and bridging an amp allows you to push more power and ultimately, crisper and louder volume. But how to bridge an amp isn’t as straightforward as doubling up on the wires or terminals and pumping up the volume.
It doesn’t need to be the most complex of wiring circuits, but there are a few important things you need to make sure you’ve covered before switching on the electricity to try out your new powerful bridged amplifier.
And if you’ve never bridged and amplifier before, it’s a good idea to read up how to do so. After all, you could damage your amp or speakers if you do it wrong.
Jump straight to the bridged 4 channel amp wiring diagram to see how to wire the outputs.
Why Bridge An Amp
Bridging an amp is a great way to run a more powerful set of speakers or subwoofer by combining a pair of channels into a single mono channel.
For example, a 4-channel amp can be bridged into a 2 or 3-channel amp and a 5-channel amp can be bridged into fewer channels to drive more powerful loudspeakers and subwoofers.
So, if you find yourself with spare channels, or you have just got a powerful subwoofer and you’re happy to sacrifice some channels, it’s a good idea to bridge your amp.
It’s a common procedure with car audio enthusiasts, who want more power to drive high-performance speakers or an extra subwoofer, without splashing out more money on a more powerful amplifier.
For example, a 2-channel amp rated for 75W RMS per channel at 4 Ohms, could potentially produce up to 200W RMS at 2 Ohms into one channel, giving you a potentially powerful monoblock amp to power a subwoofer
Or with a 4-channel amp, you could drive your speakers with 2 channels, and a powerful subwoofer with 2 bridged channels. This will allow you to power some high-performance component speakers and a subwoofer.
Bridging An Amp – Things To Look Out For
Not all amplifiers are bridgeable, so you have to know whether yours is before attempting it, although most modern amplifiers are amplifiers nowadays.
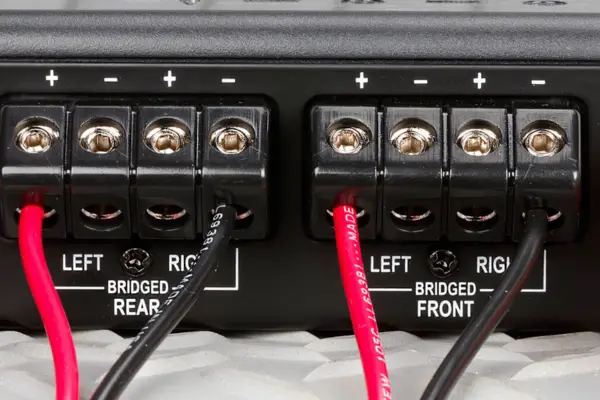
Most amplifiers have a small diagram near the channels indicating the terminals you should use to bridge. If it’s not there, check your manufacturer’s manual to discern which channels you should use.
The thing you really need to ensure you’re aware of is the impedance rating, which is given in Ohms (Ω). Ensure you’ve met the required minimum impedance that the manufacturer recommends on your amplifier manual.
Most car amps today have a minimum impedance of 2 Ohms when bridged, although some support 1 Ohm or 4 Ohms, so make sure you know what yours can handle before bridging.
Bridging an amplifier cuts the resistance load (measured in Ohms) in half, because each channel of the bridged pair sees one half of the speaker load. So, if your amplifier is 4 Ohms, your bridged channels will be 2 Ohms.
This means that a bridged amp driving an 8 Ohm speaker is actually operating into a 4 ohm load, so make sure your speakers are rated to handle the increased power that is provided by bridging.
Also, be sure to check your manual to make sure the amplifier can work effectively at half the Ohms it uses un-bridged.
When bridged, you can connect a single or multiple speakers to the bridged channels, as long as the amount of impedance matches the required minimum impedance.
For example, with a 4 Ohm bridged amplifier you can run the following:
1 x 4 Ohm subwoofer
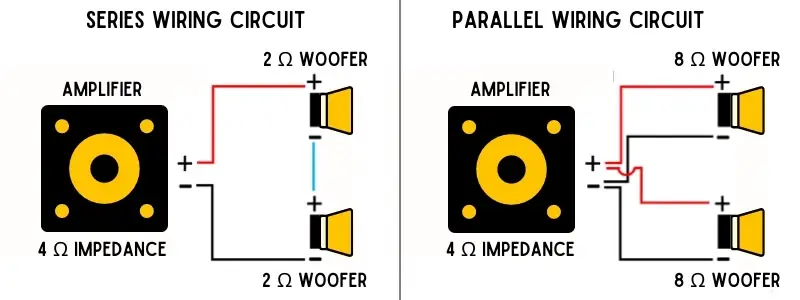
2 x 8 Ohm subwoofers wired in a parallel circuit ( 8 Ohms ÷ 2 = 4 Ohms)
1 x 8 Ohm Dual Voice Coil (DVC) subwoofer wired in parallel (8 Ohms ÷ 2 = 4 Ohms)
2 x 2 Ohm woofers wired in a series circuit (2 Ohms x 2 = 4 Ohms)
Parallel wiring is more recommended than series wiring, because parallel wiring lowers impedance, whereas series circuits drives up impedance x2.
It’s important to note that all amps are different and the RMS power they can produce when bridged varies, and it doesn’t mean you’ll necessarily get more than double the RMS power.
And another thing to note: If you bridge an amp, each channel will be handling more electrical current than it would before it was bridged, so it will need to extract more power from your car battery.
How To Bridge An Amp
You should always be aware of the amplifier you’re buying and know whether it’s bridgeable or not. They usually have the bridgeable terminals labelled, so getting the wiring right isn’t that tricky.
Before bridging you should know the layout of the terminals. Depending on the amount of channels your amplifier has, you will have a positive + and a negative – for each channel.
To bridge the amp and a subwoofer in parallel pattern, connect the subwoofer positive (+) terminal to the positive amplifier bridged terminal, and the speaker negative (-) terminal to the negative bridged amplifier terminal.
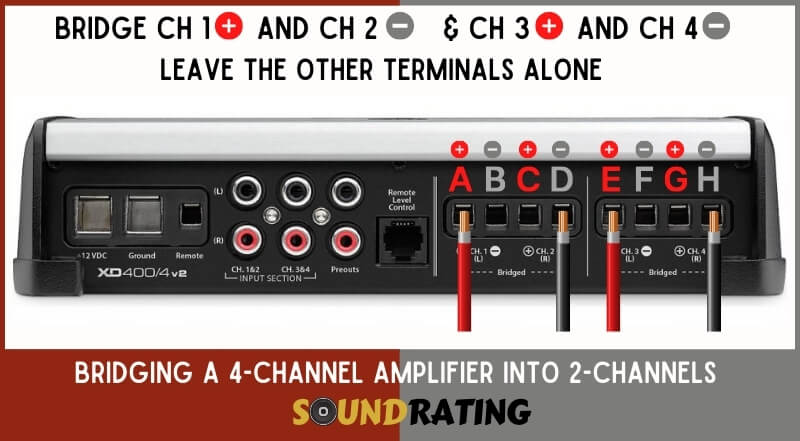
For example, see the bridged 4 channel amp wiring diagram below. Of course, this 4-channel amp has four terminals with a (+) and (-) for each one.
To bridge your amp you have to connect the speaker wires to a (+) and (–) channel. So the (+) speaker lead should go in the (+) terminal in channel 1 of the amp. And the (–) speaker wire should go in the negative terminal in channel 2 (not channel 1).
The speaker wires should be screwed in to the correct terminal securely. The speaker wires will likely need to be stripped of the insulation at the end, so you can create a secure connection.
It’s important to use good quality connection for speaker connectors because vehicles are prone to vibration and without a good connector it will disrupt the performance of your amplifier.
Many people do just screw in the wire securely, and this is fine, but getting some good quality spade connectors will give you the most secure connection.
And while your speakers or subwoofer will be receiving more power than without bridging, it’s a good idea to use a good quality speaker wire.
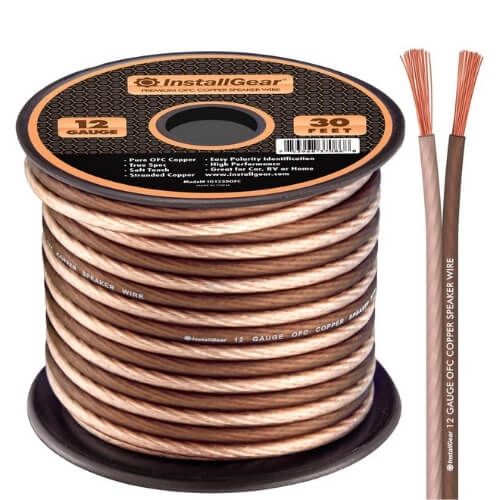
Usually, 18 AWG speaker wire is sufficient, unless you’re powering a high power subwoofer, in which case you will need something as big as 12 gauge. But it depends on your specific sub, so consult your user manual to determine the correct size.
Make sure you use good quality speaker wire, because typical electrical wire is cheaper for a reason – the copper is of lesser quality and is prone to rust. You can get a full amp wiring kit, which has everything you need.
Important Things To Remember
Connecting a single speaker of the required minimum impedance or higher is fine. You can also connect more than one speaker to the bridged channels as long as the total adds up to the minimum impedance or higher.
It’s better to wire your speakers in a parallel circuit, and for this you need to divide the impedance in 2 to egt the impedance you’ll be running. If you wire your speakers in a series circuit you should multiply impedance by 2 to figure out the impedance your amplifier should be.
Dual-voice coil speakers can be used if they can be wired to give the correct amount of impedance, but remember the Ohms will be divided or multiplied in 2, depending which way you wire it.
If you’re using 2 speakers, it’s better to wire them in parallel to ensure they each receive an equal amount of power. In fact, series wiring isn’t recommended at all if you can do a parallel circuit.
You also need to set the crossover of your bridged amp correctly. Most amps come with a built-in crossover features which allows you to adjust the high-pass, full-range, or low-pass.
It’s trial and error until you get your desired sound, but for most bridged amps where the amp is connected to a subwoofer or set of subwoofers, you should play about with the crossover to get your desired sound.
So, you’ve bridged your amp and are now ready to run some high-performance speakers and/or a subwoofer or two. As long as you ensure you have covered all bases with the impedance and bridged the correct channels, you should be fine.

I am a passionate and skilled car audio enthusiast with 15 years of experience in the industry. My journey started when I replaced my first set of factory car speakers, sparking a deep love for high-quality sound. Since then, I have worked as a representative for renowned brands like Kenwood and Alpine.
With a background in both retail and distribution, I have developed a comprehensive understanding of the car audio market. Currently a certified (MECP) installer in the Mobile Electronics industry, my expertise lies in delivering top-notch audio installations. My knowledge, coupled with my genuine passion, makes me the go-to professional for all car audio needs.
good evening i have a 8ohm 500 watt sub with a 4 channel 400 watt amp can i make this work?
If you can bridge your amplifier, it will be fine, but make sure the impedance matches. You can always parallel wire your sub if you need it to be 4 ohms.