How to Install a Single DIN Receiver into a Double DIN Space
Upgrading your car’s stereo system is one of the best ways to improve your driving experience, especially if you wish to go for the retro look and replace your double DIN receiver with a single DIN.
Whether you want Bluetooth connectivity, better sound quality, or a more retro dashboard setup, replacing a double DIN unit with a single DIN radio is a great option. However, since a single DIN radio is smaller, it’s not a straightforward out-in job. You’ll need to install a mounting kit to fill the extra space and ensure a proper fit.
This guide will should you how to install a single DIN receiver into a double DIN space, walking you through each step of the installation process. Whether you’re a beginner or have some experience with car audio installations, this step-by-step approach will help you complete the process efficiently.
By the end, you’ll have a modernized or retro car stereo with the features you need, all while maintaining a professional and clean look in your dashboard.
How to Install a Single DIN Receiver into a Double DIN Space
Upgrading your receiver by replacing a double DIN unit with a single DIN head unit is a great way to modernize your audio system while freeing up space. Follow these steps for a clean and secure installation.
1. Disconnect the Car’s Battery
- Open the hood and disconnect the negative (-) battery terminal using a wrench.
- This prevents electrical shorts while working on the wiring.
2. Remove the Dash Panel
- If necessary, unscrew any retaining screws holding the dash panel in place.
- Use plastic trim removal tools (not a flathead screwdriver) to gently pry off the panel.
- Set the panel aside in a safe place.
3. Unscrew and Remove the Double DIN Radio
- Locate the screws or bolts securing the radio.
- Use a Phillips screwdriver or socket wrench to remove them.
- Carefully pull the double DIN unit out, exposing the wiring at the back.
- Disconnect the wiring harness, antenna cable, and any other connections (USB, AUX, microphone, etc.).
")
4. Install a Single DIN Mounting Kit (Required for Proper Fit)
- Since a single DIN unit is smaller, install a single DIN mounting kit with a storage pocket to fill the extra space.
- Follow the mounting kit’s instructions to attach the pocket below or above the new head unit.
- Secure the bracket properly before inserting the radio.
5. Insert the Single DIN Head Unit into the Mounting Bracket
- Slide the new single DIN radio into the bracket provided with the kit until it clicks into place.
- Ensure it fits snugly inside the frame.
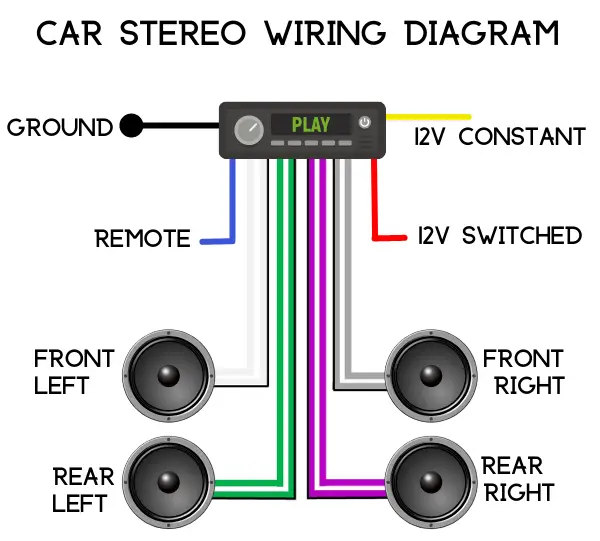
6. Connect the Wiring Harness
- If your new head unit’s wiring doesn’t match the car’s factory harness, use a wiring adapter for compatibility.
- Match wires by color code (power, ground, speaker connections, etc.).
- Secure the connections using crimp connectors or soldering (avoid just twisting wires together).
- Plug the wiring harness and antenna cable into the back of the new head unit.
7. Insert the Single DIN Head Unit and Secure It
- Carefully push the mounting kit (with the head unit installed) into the dashboard.
- Align it properly and screw it into place using the existing mounting points.
8. Reassemble the Dash Panel
- Place the dash panel back in position and snap it into place.
- If screws were removed earlier, secure them back to hold the panel firmly.
9. Reconnect the Car Battery and Test the New Head Unit
- Reconnect the negative (-) battery terminal to restore power.
- Turn on the new radio and test all functions (sound output, Bluetooth, AUX, USB, radio reception, etc.).
- Adjust the settings as needed for the best audio performance.
Final Tips:
- Always double-check wiring connections before finalizing installation.
- If your car has steering wheel controls, you may need an adapter to retain functionality.
- Use a wiring diagram for your car model if needed to ensure proper connections.
Installing a Single DIN Receiver into a Double DIN Space isn’t as Difficult as it Seems
Replacing a double DIN radio with a single DIN unit may seem challenging, but with the right tools and a step-by-step approach, the process is straightforward.
Ensuring a proper fit with a mounting kit, securely connecting the wiring, and carefully reinstalling the dash panel will help you achieve a clean and professional installation. Taking the time to test all functions before finalizing the setup ensures everything works as expected.
With these steps, your new single DIN radio will be installed securely and working properly in your double DIN space. Enjoy your upgraded car audio system!

I am a passionate and skilled car audio enthusiast with 15 years of experience in the industry. My journey started when I replaced my first set of factory car speakers, sparking a deep love for high-quality sound. Since then, I have worked as a representative for renowned brands like Kenwood and Alpine.
With a background in both retail and distribution, I have developed a comprehensive understanding of the car audio market. Currently a certified (MECP) installer in the Mobile Electronics industry, my expertise lies in delivering top-notch audio installations. My knowledge, coupled with my genuine passion, makes me the go-to professional for all car audio needs.