How To Tune a Car Amp
We all want the best sound stage, with pristine, loud and crisp volume, so that means getting your amp settings right. And as with most things to do with car audio, how to tune a car amp isn’t exactly plug n play.
Whether it’s more bass in your car or crisp midrange and highs, an amplifier adds the most impact to your fidelity. getting your amp settings wrong could introduce problems such as speaker crackling and much worse, so getting the tuning right is as critical as getting an amplifier in the first place.
Car amps are a complex piece of equipment. And all the knobs, dials, inputs and outputs can be a little daunting to any aspiring audiophile, but the main thing you need to fix is setting the amp gains correctly.
Eradicating distortion is key to getting the cleanest sound from your amp, and getting the Gain Control right will achieve this, no matter what amplifier you have.
It takes a little more than this, but once you get that sorted, you’ll be almost there with the cleanest and best car sound. So, with that said, let’s see how to tune a car amp.
How Does A Car Amplifier Work?
Before we get into the nitty gritty of how to tune a car amp, it’s always good to understand what one really is. Everyone knows what amplify means, but knowing how an amplifier works will help you understand the tuning process.
Your car radio receiver has a built in amplifier and they do a similar job but are nowhere near as powerful, and won’t get the volume and clarity audiophiles demand.
An amp takes a low voltage signal and amplifies it to a much greater sound before sending the signal out to your speakers. Your speakers will then drive the music with much greater volume and clarity.
This is why we need an amplifier, and this is why we need to know how to tune one. Basically it’s the same thing as the amplifier in your speakers, but an aftermarket amp is an external device, that’s much more powerful.
The results you’ll get from an aftermarket amplifier will make the biggest impact to your sound system, as long as you get the tuning right.
Your car amp must be in tune with your speakers, because too much current and you could do some serious damage to your speakers. Too little current and you might as well switch your amplifier off.
How To Tune A Car Amp – Set The Volume and Gain Control
If you have a suspect sound in your car, your amplifier probably needs adjusting, and one of the first things you should consider for how to tune a car amp is your Gain Control.
There are three ways to set the gain, two professional and one by ear, and obviously the professional ways will get you the best results. However, for those that don’t want to buy all the equipment, you can get a good tune by ear.
Method 1 – Setting Amp Gains Using a Digital Multimeter.
You can set your car amp gains using a Digital Multimeter. One of these gives you a good idea of getting the right settings for your Gain Control, but it depends on the quality of your amp as to whether you’ll get an accurate reading.
So, as you start you want to make sure the speaker wires are unplugged, and the RCA jacks are disconnected. Also, make sure the Bass Boost, Mids or Treble aren’t turned up at all. If they are turn them right down.
Setting the amp gains with a multimeter is pretty accurate and a relatively cheap way to tune a car amp, but you should combine this way with either method 2 or 3, as well.
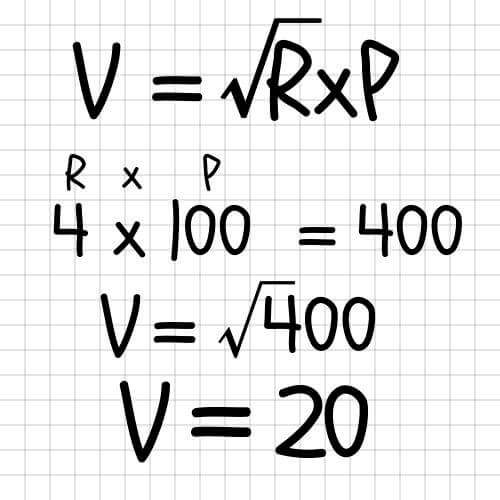
To start, we need to do a simple math formula to find out the voltage. Whatever RMS per channel your amplifier is, you need to total that and multiply it by the amount of ohms you’re running your amp at. Then the square root of your total will be your voltage.
Remember, if you have an amp that has separate gains setting for a subwoofer and your speakers, you should only do the math for the channels you’re working on, as the subwoofer channel’s voltage will be different.
For example, I have a 600W RMS 5-channel amp, but I am only setting the gain for the 4 main channels, so I will work out the math for these.
Each of the 4 main channels can produce 100 watts per channel at 4 ohms, so I multiply that and get 400. The Square Root of 400 is 20, so the voltage of my car amp’s main front and back channels is 20.
Now I know the voltage I want to get my Digital Multimeter and set it to AC volts and plug the positive and negative leads into the amp’s speaker outputs.
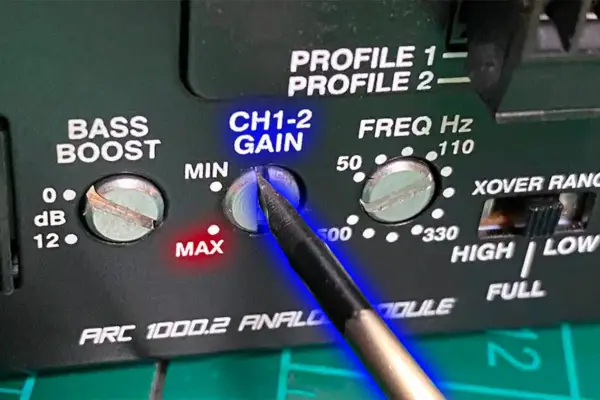
Whatever measure the multimeter starts at I want to match it with the voltage of my amp, so for my example I want to adjust the Gain Control and get it to 20.
Obviously, if the voltage reading on the multimeter is lower than 20, adjust the gain clockwise, and if it’s too high, lower it by adjusting it anti-clockwise. Once you get to your desired voltage reading on the multimeter, you’ve set the amp gains.
But there’s a potential problem with this method in that we have to assume that there wouldn’t be any distortion as we turn the stereo up.
Also, the quality of your amp will determine whether you have distortion before you reach the max RMS output (my example was 100w for each channel). If you have a cheap amp, you will get distortion before you max output. In this case, the math formula above won’t be accurate, so it’s always a good idea to either set it with a Distortion Detector, or do it by ear. Both of which I explain below.

Method 2 – Setting Car Amp Gains Using a Distortion Detector
A better method to accurately set your car amp gains is using a Distortion Detector. This could also be used with your multimeter method to check how accurate you were.
The main problem with this method is that Distortion Detectors aren’t cheap, so if you’re not a professional, you might not consider getting one. That said, if you really wan to tune a car amp precisely, this is the best way.
A Distortion Detector, does as its name suggests, and if you use one to check your distortion after setting you amp gains with a multimeter, you can check to see if you have distortion.
To check, simply connect your Distortion Detector to the speaker outputs to see what the distortion is, and if the distortion light illuminates, obviously your gains aren’t set properly.
Now to set the amp gains with the Distortion Detector you need to turn the gain dial all the way down, and then slowly turn the volume on your car radio receiver up until you see the distortion light on your detector flash.
Then turn it down very slightly, making sure your volume is just under the setting for when the distortion light turns on.
Now you’re ready to adjust the amp’s gain control again. As with before, turn your gain control clockwise, keep turning until your distortion light turns on. Once you get distortion, you need to turn it back very slightly until it goes off. And now you have set the Gain Contril more accurately thanks to the Distortion Detector.
As already stated, Distortion Detectors aren’t cheap, so not everyone is willing to buy one, but it will give you the most accurate way to set your Gain while tuning your car amplifier.
Method 3 – Setting Amp Gains by Ear
This way is a little different, and should be used even if you have a digital multimeter, as only using that probably won’t be 100% accurate.
To set the amp gains by ear, turn your receiver back on, turn the volume up to the max without any music playing. To keep it simple, let’s say the number for your max volume is 100, now turn it down by 20% so the volume is at 80.
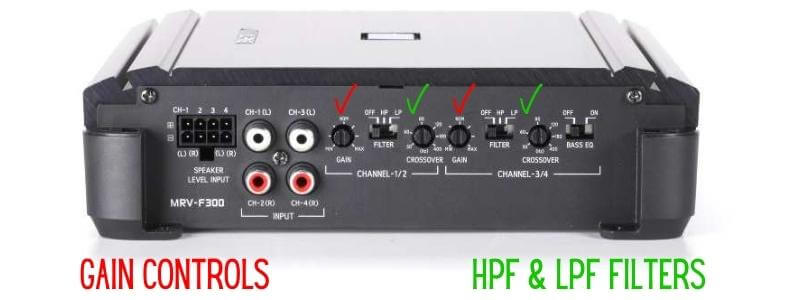
Now turn your Gain Control and Bass Boost to zero and turn the Crossover Filters – High Pass Filter (HPF) and Low Pass Filter (LPF) – to off.
Now plug the RCA jacks back into the amp channels you want to tune, and with some music playing turn the Gain Control up slowly. Keep turning it up until you start to hear some distortion in your speakers. Then, turn the gain back down slowly until the distortion stops.
It’s a bit like tuning a musical instrument, simply go a bit high and then down slowly until you find that sweet spot your ear enjoys, and that is your gain set.
Tuning The Crossover Filters
Now you’ve set the gains it’s time to tune the High and Low Pass Filters that are built into your amplifier.
As the name of the filters suggest, the Low Pass Filter (IPF) directs the low frequency to the right driver, while the High Pass Filter (HPF) only lets the frequencies above the filter setting pass through.
If you’re trying to tune an amplifier for some speakers, you want to select the HPF to allow the mids and highs through. With this you want to adjust the HPF setting to about 80Hz, so all frequencies above this are sent to your main drivers.
And if you are tuning your amplifier to set with your subwoofer you want to do the opposite with the IPF. So, here you want to set the frequency also at about 80Hz, so all frequencies below 80Hz are sent to your subwoofer.
The HPF and LPF dials are different on every amplifier, but the settings are generally 80Hz.
Tuning The Bass Boost
Many audiophiles don’t go for the Bass Boost feature, and if you’ve set the Gain and Crossover Filters correctly, you shouldn’t need it. Some amps even say ‘Not Needed’ on the Bass EQ dials.
But if you want that extra oomph to your low frequencies, then tuning your Bass Boost will give your bass that extra kick, probably only you need.
Of course, the Bass Boost is for the subwoofer and will be on the subwoofer channel on your amp. And if you intend to pump the bass up, be sure to turn your gain down before setting it.
To set your Bass Boost is down to personal choice, as I say – I don’t recommend it, but once your gain and Bass Boost are down to zero, and then play some bassy music, or a 40HZ Test Tone CD, and turn up your bass boost until you start getting distortion.
When this happens, simply turn down the Bass Boost until the distortion stops, and you’ve done. Now set your amp gains again to make sure it’s set correctly.
How To Tune a Car Amplifier? You‘ve Just Done It!
Once you’ve set the gain and crossover filters correctly, and of course if you’re determined to use the Bass Boost, it’s time to try it out.
Re-connect the speaker wires, RCA jacks or whatever you unplugged, turn your car radio receiver on but turn the volume down to zero. Then, put some of your favourite music on and slowly turn it up to about 80%.
If you can reach this high without getting any distortion, you’ve tuned your car amp correctly. If not, listen for the distortion and determine whether it’s coming from the speakers or the sub, and turn the gains down until the distortion stops.
Congratulations, you’ve just tuned the car amp and your every drive should now sound much better. Enjoy!
One thing to remember: to get the very best out of your sound system, each genre has different settings. So, if you take your Drake album off and replace it with ACDC, you might need to adjust the gain control again to get the cleanest sound.

I have a BA in English Literature. I used to be an English teacher, but have turned to writing full-time. With a strong academic background in literature, I have cultivated a deep appreciation for the power of words and storytelling. I write for several websites and have had my work published in Mixmag music magazine back in the 1990s.
Beyond literature and writing, I have diverse interests that fuel my creativity. I am fascinated by the world of Bitcoin and its potential to reshape the financial landscape. Additionally, I am an avid sports enthusiast, passionately following my favorite teams. Music is another source of inspiration for me, and the louder the better! When I’m not engrossed in my writing projects, I prioritize spending quality time with my family.