How to Connect All Your Devices to One Audio Receiver
Selecting the right audio receiver is essential for integrating multiple devices into a seamless home entertainment system. As the central hub for managing both audio and video signals, the receiver plays a pivotal role in determining how effectively a system functions.
Understanding device requirements, available ports, and essential features is the first step toward the perfect audio-visual setup. This guide explores everything from port types and connection strategies to calibration tips and audio quality enhancements, providing a comprehensive roadmap for building a reliable and immersive entertainment system.
Choosing the Right Audio Receiver
The foundation of a well-connected entertainment system lies in getting the right audio receiver. Think about all your current, and possible future, devices that will need connecting. This could be televisions, speakers, gaming consoles, and streaming devices, so getting a receiver that offers the necessary ports and functionalities is essential.
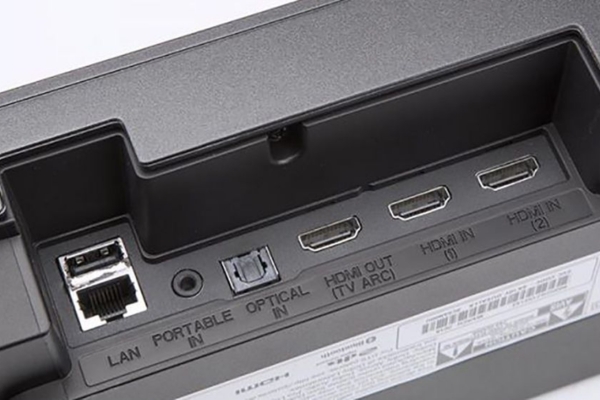
Modern receivers typically feature a range of input and output options. HDMI ports are the standard for transmitting high-quality audio and video signals, and receivers equipped with multiple HDMI inputs facilitate simultaneous connections for various devices.

For older hardware, RCA or optical audio inputs may be necessary. USB and Ethernet ports can provide additional flexibility for streaming devices and firmware updates, making them valuable considerations.
Audio channel configuration is another crucial factor. A basic 5.1 setup, consisting of five speakers and a subwoofer, delivers immersive surround sound, while a 7.2 setup offers even greater depth. Receivers supporting Dolby Atmos or DTS:X enhance spatial audio, creating a three-dimensional soundstage.
Future-proofing should also be taken into account. Features such as 4K and 8K passthrough, Bluetooth and Wi-Fi connectivity, and firmware update capabilities ensure longevity.
We all have a certain budget, and sometimes you don’t have to go all out, because high-end receivers often include features that may be unnecessary for standard home setups, so consider your needs before spending.
Understanding Receiver Ports and Connections
Familiarity with available ports simplifies device integration and maximizes performance.
- HDMI Ports: These serve as the primary connection for modern audio and video devices. HDMI ARC (Audio Return Channel) and eARC (Enhanced Audio Return Channel) streamline communication between the receiver and TV, reducing cable clutter and simplifying audio output.
- Optical Audio (TOSLINK): This fiber-optic connection provides a reliable digital audio signal. It is commonly used when HDMI ARC is unavailable and supports high-quality audio formats, though it lacks the bandwidth for advanced codecs like Dolby Atmos.
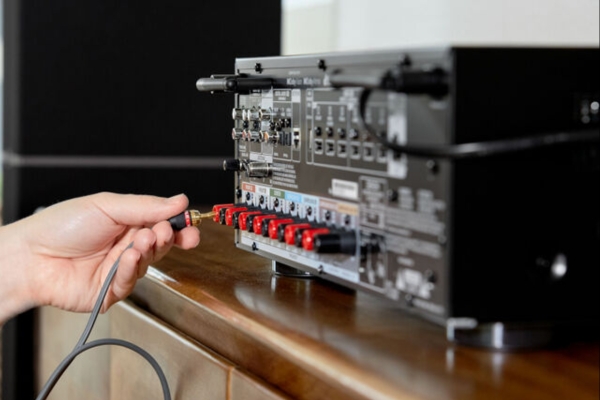
- RCA (Analog Audio): Traditional red and white RCA connectors are useful for legacy devices but don’t offer the same fidelity as digital connections.
- Digital Coaxial: A robust alternative to optical audio, this connection transmits digital audio signals via electrical impulses rather than light.
- 3.5mm Auxiliary: Often found in portable devices, this connection is suitable for quick audio input but is limited in quality.
- USB Ports: Used primarily for media playback and firmware updates, some receivers support direct digital connections for improved audio fidelity.
- Ethernet: A wired internet connection enhances streaming stability and allows integration with smart home systems.
Verifying compatibility between the receiver and connected devices minimizes configuration issues and prevents signal degradation.

Setting Up an Audio Receiver for Optimal Performance
Proper placement and calibration are essential to maximizing an audio receiver’s potential. Adequate ventilation is necessary to prevent overheating, as stacking devices can obstruct airflow and reduce efficiency.
Receivers feature preset sound modes tailored for different media, including movies, music, and gaming. Adjusting the equalizer settings allows customization of bass, treble, and mid-range frequencies, tailoring your sound to room acoustics and personal preference.
Most modern receivers include an automatic speaker calibration system that optimizes sound distribution based on room dimensions. Using the provided microphone, this system measures acoustic reflections and adjusts speaker levels accordingly.
Firmware updates shouldn’t be overlooked, as manufacturers frequently release improvements that enhance performance and resolve compatibility issues. Regularly checking for updates ensures that the receiver operates at peak efficiency.
Cable management plays a significant role in both aesthetics and functionality. Organizing and labeling cables reduces clutter and simplifies troubleshooting when adjustments are required.
Connecting a TV to an Audio Receiver
Establishing a connection between a television and an audio receiver enhances sound quality and enables centralized control over multiple devices. The best way is through HDMI ARC. This allows the TV to transmit audio to the receiver via the same HDMI cable used for video input. If the TV doesn’t have ARC functionality, an optical cable serves as a reliable alternative.
Once the physical connection is established, settings must be adjusted accordingly. The TV’s audio output should be set to external speakers, and Consumer Electronics Control (CEC) should be enabled to facilitate synchronized power and volume control.

In cases where optical audio is used, the TV’s digital audio output should be configured to PCM or Bitstream, depending on the receiver’s capabilities.
Integrating Gaming Consoles with an Audio Receiver
For the best gaming experience, consoles should be connected directly to the receiver via HDMI. This ensures high-quality audio processing while allowing the receiver to transmit video signals to the TV.
Optimizing audio settings within the console enhances spatial awareness and realism. Surround sound formats such as Dolby Atmos or DTS:X should be enabled when supported.
And enabling game mode on both the receiver and TV minimizes latency, ensuring responsive gameplay.
Maximizing Sound Quality Across Devices
Fine-tuning settings and considering room acoustics significantly impact overall sound quality. Most receivers offer manual adjustment options for frequency response, speaker levels, and surround sound processing.
Speaker placement also plays a crucial role. Front speakers should be positioned at ear level, with surround speakers strategically placed to create an immersive soundstage. And don’t cut corners with the cables: high-quality cables reduce signal loss and interference, and will improve your audio output.
Auto-calibration tools, included in many receivers, analyze room acoustics and optimize speaker output accordingly. These tools are fantastic and help compensate for irregularities such as reflective surfaces or uneven speaker distances, ensuring balanced sound distribution.
The quality of the audio source has another strong influence on performance. High-bitrate streaming services, lossless audio formats, and Blu-ray discs offer superior fidelity compared to compressed files. And don’t forget room acoustics: Using rugs, curtains, and acoustic panels reduces sound distortion and enhances clarity.
Check out more from our Soundrating Blog…
Understanding Audio Receivers: The Heart of Your Sound System

I am a passionate and skilled car audio enthusiast with 15 years of experience in the industry. My journey started when I replaced my first set of factory car speakers, sparking a deep love for high-quality sound. Since then, I have worked as a representative for renowned brands like Kenwood and Alpine.
With a background in both retail and distribution, I have developed a comprehensive understanding of the car audio market. Currently a certified (MECP) installer in the Mobile Electronics industry, my expertise lies in delivering top-notch audio installations. My knowledge, coupled with my genuine passion, makes me the go-to professional for all car audio needs.
